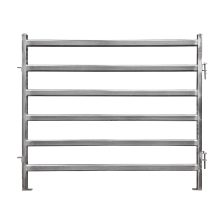
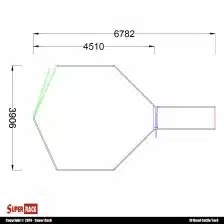
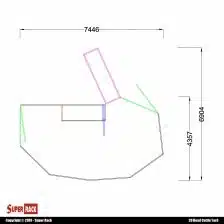
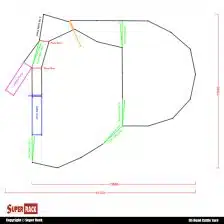
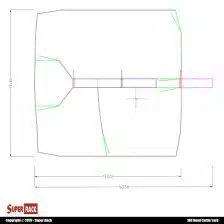
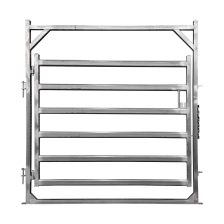
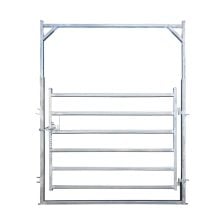
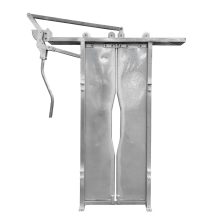
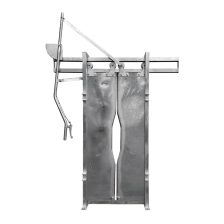
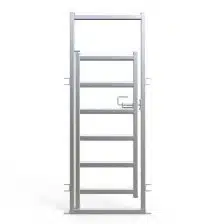
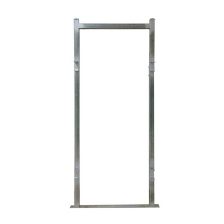
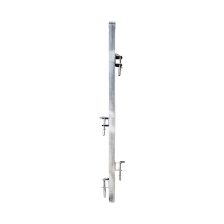
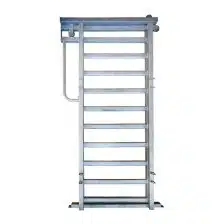
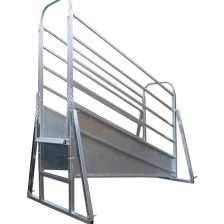
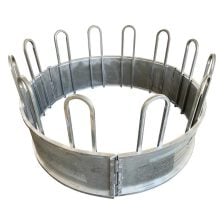
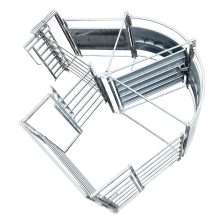
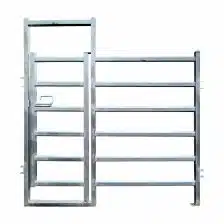
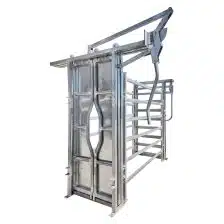
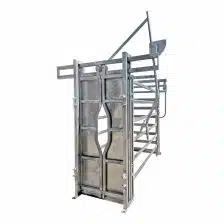
A great set of cattle yards doesn’t just happen by accident. It all starts with smart planning, well before you even think about posts and panels. The best designs focus on the basics like all-weather truck access, good drainage, and working with the natural behaviour of your livestock, not against it.
It’s about building a system that’s safe for both your animals and your workers, runs efficiently for your operation, and is tough enough to handle Australian conditions for years to come.
Planning Your Ideal Cattle Yard Layout
The success of your new yards is decided long before a single post hits the ground. It’s won or lost on paper, in your head, and out in the paddock. Getting this planning stage right will save you a world of pain, money, and frustration down the track.
A well-thought-out plan considers everything from the natural lay of the land to your business goals for the next decade. This is your chance to build a yard that works for you, not one you have to fight with every time you use it.
Choosing the Perfect Site
Where you decide to build your yards is probably the most critical decision you’ll make. A poor site choice can leave you battling mud, struggling with truck access, and dealing with inefficient stock flow for years.
Here’s what you should be looking for:
- All-Weather Access: This is a non-negotiable. Your yards must be accessible for B-doubles in any weather. A boggy track to the loading ramp in the middle of a wet winter is a complete nightmare. You need a solid, well-drained road that can handle heavy vehicles, rain, hail, or shine.
- Excellent Drainage: Waterlogged yards are a serious hazard. They create a muddy, slippery mess that increases the risk of injury for stock and staff, not to mention the health issues. Look for a site with a gentle, natural slope—around 2-4% is the sweet spot—to let water run off easily. A gravel or rubble base can also make a massive difference.
- Central Location: Try to position your yards so they’re easy to get to from most of your paddocks. This cuts down on mustering time and reduces how far the cattle have to travel, which is a big part of low-stress stock handling.
A well-drained, central site with bulletproof truck access isn’t just a ‘nice to have’—it’s the foundation of a functional yard. It’s the difference between a real asset and a constant headache.
Assessing Your Herd and Future Needs
Your cattle yard design has to be tailored to your operation. A yard built for a small stud breeder will look completely different to one set up for a large-scale backgrounding operation.
Start by asking yourself a few honest questions:
- What’s my current herd size and type? (e.g., breeders, weaners, trade steers)
- What’s the maximum number of head I need to process in one go?
- Where do I see the operation in the next five or ten years?
Building with your future needs in mind is far cheaper than trying to expand a cramped, poorly designed yard later on. Trust us, it’s always better to have a bit of extra space up your sleeve than not enough.
This same principle applies right across agricultural infrastructure. For example, a large-scale Aussie feedlot needs a precise layout to manage thousands of head efficiently. A 5,000-head feedlot can chew up over 22 hectares just for pens, yards, and facilities, which really drives home how vital that forward-planning is.
Modern tools like drones for agriculture can be incredibly helpful when you’re mapping things out. Getting that bird’s-eye view helps you see the bigger picture—mapping out drainage, paddock access, and the best orientation before you’ve even broken ground. At Super Rack, our team has the expert advice to help turn those plans into a practical, high-quality yard that will serve your operation for decades.
Essential Components for a Low-Stress System
A well-designed cattle yard is more than just a collection of fences. Think of it as a finely tuned system where every piece works together to guide livestock calmly and safely. Understanding how each component fits into the puzzle is the secret to a setup that lowers stress on your animals and, frankly, makes life a whole lot easier for you.
When it comes to effective cattle yard design in Australia, good flow is everything.
The layout has to work with the natural instincts of your cattle, not against them. There’s a reason designs like the classic bugle shape or modern circular yards are so popular—they get rid of the sharp corners and dead ends that make cattle baulk and turn back. The whole idea is to encourage forward movement with the least amount of pressure.
The Key Working Areas
Every part of the yard has a specific job. From the moment stock comes into the receiving pens to the final drafting gates, a logical sequence is what guarantees smooth, efficient processing. Nailing the dimensions and connections between these areas is what lets a single person operate the entire system without breaking a sweat.
Here are the non-negotiable parts of any low-stress yard:
- Receiving and Holding Yards: This is the first stop for stock coming in from the paddock. They need to be big enough to comfortably hold your largest mob without overcrowding. Having adequate water here is an absolute must for keeping stress levels down. Planning for large plastic storage tanks essential for farm operations is a smart move right from the start.
- Forcing Pen (or Yard): This is the engine room that feeds cattle into the race. A circular or teardrop shape is miles better than an old-school square pen. It removes corners and uses the cattle’s natural tendency to circle, which creates a steady, reliable flow.
- The Race (or Alley): This is the narrow laneway leading up to the crush. Solid sides are usually the way to go, as they cut down on distractions and keep cattle focused on moving ahead. The race should be long enough to queue up several animals but just narrow enough so they can’t turn around.
- The Crush (or Chute): Here’s where all your individual animal handling happens—vet work, tagging, you name it. This needs to be a heavy-duty, rock-solid piece of equipment with a secure head bail and plenty of easy access points for the handler.
- Drafting Area: Situated right after the crush, this is where you’ll sort cattle into different groups using a series of gates. Good visibility and gates that operate quickly and quietly are the keys to getting this bit right.
Layouts That Leverage Cattle Behaviour
The best yard layouts use clever design to make handling stock feel almost effortless. A bugle design, for example, uses a long, curved race that gently funnels cattle towards the crush. Because they can’t see the handler or the crush waiting at the end, they tend to move forward much more willingly, with less prodding.
Likewise, a well-placed loading ramp is a critical piece of the puzzle. It needs to be positioned for easy truck access and have a gentle slope with non-slip flooring. A poorly designed ramp isn’t just a source of stress and delays; it’s a major safety risk.
A quick tip from the field: investing in high-quality, properly designed components isn’t an expense—it’s an investment in safety, efficiency, and better animal welfare. A system that flows well means less labour, minimal bruising, and a more productive operation all around.
Building a cattle yard in Australia usually follows a pretty clear path, from choosing your materials right through to the final assembly.

This process really drives home how those early choices in materials directly affect how easily the yard goes together and how well it stands up over time.
Choosing Materials That Withstand Aussie Conditions
When it comes to your cattle yard design in Australia, the materials you pick are a long-term investment. They’re what determine how long your yards will last, how much maintenance they’ll need, and most importantly, how safe they are for your livestock and your team. This isn’t just about the upfront cost; it’s about building an asset that can handle the harsh Aussie climate for decades to come.
The choice really boils down to two main players: traditional timber and modern galvanised steel. And while timber has been used for generations, steel has become the gold standard for a few very good reasons.
Steel vs Timber: The Modern Choice
Timber yards can look the part, but they demand a hefty maintenance schedule. They’re vulnerable to termites, rot, and fire—all very real risks in the Australian bush. Timber also splinters over time, creating hazards for your cattle, and needs regular painting or treating to stand a chance against the weather.
Galvanised steel, on the other hand, is built tough. It’s fire-resistant, termites can’t touch it, and a quality finish will stand up to rust and corrosion for years with bugger-all upkeep. A good steel yard isn’t just a structure; it’s peace of mind.
What to Look for in Quality Cattle Panels
Not all steel panels are made equal. When you’re spending good money on a new set of yards, you need to know what you’re paying for. A cheap panel might save you a few bucks today but could cost you dearly in bent rails, broken welds, and safety headaches down the track.
Here’s a practical checklist for spotting quality:
- Steel Gauge and Profile: The thickness of the steel and the shape of the rails make a huge difference. Heavy-duty oval rails are a popular choice because they provide a wider, flatter surface that’s gentler on stock while offering far better strength against pressure than standard round pipes.
- Weld Integrity: Get up close and have a good look at the welds. They should be clean, consistent, and fully penetrate the joins. Weak or sloppy welds are the first thing to give way when a cranky bull decides to test your new setup.
- The Galvanised Finish: This is the big one for longevity. A hot-dip galvanised finish is the best you can get. This process involves dunking the entire panel in molten zinc, coating it inside and out for maximum protection against rust. Cheaper pre-galvanised or painted finishes just won’t cut it long-term.
Getting the Height and Rails Right
The height of your panels and the number of rails you choose should match the cattle you’re handling. You don’t want a big beast jumping over the top or a cheeky calf slipping underneath.
For most operations, a six-rail panel around 1.8 metres high is the industry standard. This height is more than enough to contain larger cattle like bulls and cows, while the six rails provide enough coverage to safely handle smaller stock like weaners without them finding a way out. If you only run smaller breeds, you might get away with something shorter, but a taller, six-rail design gives you the most versatility and safety.
Investing in high-quality, heavy-duty components is non-negotiable. The force from a mob of cattle in a forcing yard is immense. This is where the superior quality and robust construction of Super Rack products shine, providing the strength needed to ensure your animals and your handlers are always safe.
Our commitment to quality means we offer products that are not only tough but also competitively priced. With fast, nationwide delivery and a team ready to give expert advice, we make it easy to build a yard that’s both safe and efficient. For instance, our pre-designed layouts like the 80 Head Cattle Yard Design show how these premium components come together to create a functional, durable system from day one.
Integrating Yards with Paddocks and Laneways
A great set of cattle yards doesn’t just appear out of nowhere. The best cattle yard design in Australia sees the yards as the heart of the property, connecting to every paddock through a smart, well-planned laneway system. It’s this thinking that turns a stressful, labour-heavy muster into a smooth, low-stress operation.
The aim is to build a whole network that lets you move cattle from any corner of the property to the yards with the least amount of pressure. It’s all about making stock flow feel natural and predictable for everyone involved—animals and people.
Laneways: The Arteries of Your Operation
Your laneways are the arteries of your farm; they connect everything. A poorly designed laneway—whether it’s too wide, too narrow, or ends in a confusing bottleneck at the yard gate—is a recipe for stress and hard work. Get it right, though, and moving stock becomes a walk in the park.
When you’re mapping out your laneways, keep these points in mind:
- Width is Critical: One of the most common mistakes is making laneways too wide. It might seem like more room is better, but a wide lane just encourages cattle to turn back or mob up. For most places, a width of around 6 to 10 metres is the sweet spot for keeping a mob moving forward without hassle.
- Gate Placement Matters: Position your gates to create a natural flow. Use the lay of the land to your advantage, putting gates in corners or along fence lines where cattle would naturally head anyway. Make sure they’re wide enough for machinery but still easy for one person to handle.
- Use the Landscape: Cattle generally prefer moving uphill when being pushed and will often follow the natural contours of the land. Plan your laneway routes to work with these tendencies, not against them. A slight bend in a laneway can actually be better than a dead-straight run, as it keeps the cattle curious about what’s around the corner.
Paddock Size: The Balancing Act
Figuring out the right relationship between paddock size, yard location, and your overall setup is a constant balancing act, particularly on bigger properties. Massive paddocks might seem efficient, but they often lead to uneven grazing and make mustering a real chore. On the flip side, subdividing into smaller paddocks means a serious investment in fencing and water points.
You can really see this trade-off on the huge cattle stations in northern Australia. Research has shown that cattle in massive paddocks don’t graze the whole area. One study found that stock only used about 76-80% of paddocks larger than 34 square kilometres. In smaller 9 km² paddocks, that figure jumped to 94% usage. Subdividing the big country and adding water points boosts grazing efficiency, but the cost can be huge—climbing from around $50,000 AUD for one large paddock to over $450,000 AUD for an intensive subdivision. You can read more about these findings from the Pigeon Hole Project to get a better handle on the numbers.
A well-designed system of laneways and strategically sized paddocks is the key to low-stress stock handling. It saves time, reduces labour costs, and results in calmer, healthier cattle when they arrive at the yards.
Tying It All Together at the Yard Entrance
The spot where your main laneway meets the yards is a critical transition point. You need this entrance to be wide and inviting, funnelling down gradually into the receiving or holding pens. If you have a sudden, narrow opening, you can bet that stock will baulk there every single time.
Using wings or creating a wider “mouth” at the entrance helps guide cattle in smoothly. The design needs to give the lead animals the confidence to walk in, and the rest of the mob will follow. This is one place you can’t skimp on quality. Using tough, reliable Super Rack panels and gates ensures this high-traffic area can take the constant pressure while keeping the entry points clear and defined.
By thinking about your entire property as one big, integrated system, your cattle yards become so much more effective. It’s not just about what happens inside the yards; it’s about how easily you can get your stock there in the first place. That holistic approach is what separates a good set of yards from a great one.
Designing for Handler and Animal Safety
When it comes to good cattle yard design in Australia, safety isn’t just another box to tick—it’s everything. A well-thought-out yard protects not only your valuable livestock but, more importantly, the people working amongst them. Every single choice, from the type of gate latch you pick to the flow of the forcing pen, has to be made with safety front of mind.
Putting safety first is a direct investment in your farm’s future. A single preventable injury can be devastating, both personally and financially, which is why planning a secure working environment is one of the most critical steps in the whole process.
Building in Escape Routes
In high-pressure zones like the forcing yard and the area around the crush, things can get unpredictable in a heartbeat. A handler absolutely must have a clear and instant way out at all times. This is where manways and escape gates are completely non-negotiable.
A manway is simply a narrow gap, usually between 300mm and 400mm wide, that a person can slip through easily, but a beast can’t. These need to be placed strategically so a handler can get out of a pen fast without having to climb over a rail—a major cause of falls and serious injuries on-farm.
Placing manways in the corners of forcing yards or along the race lets handlers apply pressure to the mob and then step out of the way safely. It’s a dead-simple feature that makes a world of difference to workflow and confidence.
The Importance of Good Surfaces
Slippery surfaces are a massive risk for everyone. A wet, muddy, or worn concrete floor can cause cattle to lose their footing, which leads to stress, bruising, and potential injuries. For handlers, it creates a dangerous work environment where a simple slip could have serious consequences.
Consider these options for your key work areas:
- Grooved Concrete: In high-traffic zones like the race and crush area, grooving the concrete gives excellent traction. A diamond or checkerboard pattern is what you want.
- Gravel or Rubble Base: In holding yards, a solid base of compacted gravel or rubble is great for drainage and creates a firm, non-slip surface, stopping the area from turning into a bog after a bit of rain.
A safe yard is a quiet yard. When cattle feel secure on their feet and handlers can move confidently without risk, the entire operation becomes calmer, more efficient, and infinitely safer for everyone involved.
Smarter Workflow and Reliable Gear
A core principle of safe yard design is minimising how often handlers need to get into tight spots with stock. You can achieve this through clever design that lets you operate gates and manage stock flow from a position of safety.
For instance, a circular forcing yard with a revolving gate allows one person to guide cattle into the race from outside the pen. This completely removes the need to get in behind a mob of nervous cattle in a confined space.
This is also where your choice of equipment becomes absolutely critical. Flimsy gate latches that are a pain to operate or panels with dodgy welds are just accidents waiting to happen. You need gear you can count on, every single time.
- Slam Latches: These latches let you shut a gate securely with one hand from outside the pen, which is far safer than fiddling with pins or chains while you’ve got one eye on the stock.
- Heavy-Duty Construction: High-quality, hot-dip galvanised steel panels from a trusted supplier like Super Rack provide the strength to handle pressure from agitated animals, ensuring the yard’s integrity is never compromised.
By focusing on these safety fundamentals, you create a workspace that is not only productive but also protects your most important assets: your people. Looking at well-designed layouts like the 100 Head Cattle Yard Design can give you some great real-world examples of how these safety features come together in a complete, efficient system.
Common Questions on Australian Cattle Yard Design
When you’re knee-deep in planning a new set of yards, the questions can start piling up. Getting clear, practical answers is key to making confident decisions that will pay off for years to come. A smart cattle yard design in Australia comes from nailing the fundamentals, so let’s tackle some of the most common queries we hear from farmers on the ground.
These are the details that can make or break the functionality of your whole setup. Getting them right from the start saves a world of headaches down the track.
How Much Space Do I Need Per Head in Holding Yards?
For Aussie conditions, a solid rule of thumb is to allow at least 2 square metres per head for adult cattle. This gives them enough room to stand comfortably without being jammed together, which is critical for keeping stress levels down and preventing bruising.
You might get away with 1.5 square metres for smaller stock like weaners, but it’s always smarter to plan with a bit of extra breathing room. Overcrowding is a false economy—it just leads to agitated animals, makes them harder to handle, and bumps up the risk of injury.
Is a Circular or Straight Forcing Yard Better?
While both can get the job done, circular (or bugle) forcing yards generally come out on top. They’re designed to work with a cow’s natural instincts, not against them. When under pressure, a cow’s instinct is often to circle back to where it came from.
A circular design cleverly uses this behaviour to create a natural, continuous flow into the race, usually meaning less yelling and prodding from the handler. Straight forcing pens, on the other hand, can create dead-end corners where stock might baulk, stop, or try to turn back. For a low-stress, efficient one-person operation, a circular yard is almost always the better bet.
What Is the Most Important Part of the Yard to Invest In?
If you have to prioritise your budget, sink your money into two key areas: the cattle crush and the loading ramp. These are the zones where the most critical work happens and where the highest risks lie.
The crush is where you’ll be doing all your important animal health tasks, so it has to be safe, strong, and easy to operate. Look for one with a reliable head bail, a squeeze mechanism, and good safety features for the handler.
The loading ramp is another major point of stress and potential danger. A poorly designed ramp with a steep, slippery slope is just asking for trouble and can cause stock to flat-out refuse to move.
Investing in top-quality, heavy-duty components from a trusted supplier like Super Rack for these two areas will pay dividends in safety, efficiency, and animal welfare for decades.
What Is a Common Design Mistake to Avoid?
One of the biggest and most costly mistakes we see is not planning for the future. Building a yard that’s a perfect fit for your current herd but has zero room for growth will eventually box you in. Sooner or later, you’ll be facing expensive and frustrating modifications.
Always think about your five or ten-year business plan. It’s far cheaper to add a bit of extra capacity with a few more panels and a well-placed heavy-duty cattle gate during the initial build than to try and expand a cramped, poorly flowing yard later on. Plan for the stock numbers you will have, not just the ones you have today.
At Super Rack, we understand that a great cattle yard is a long-term investment. Our team provides expert advice to help you design a system that’s safe, efficient, and built to last. With superior quality products, competitive pricing, and fast nationwide delivery, we’re here to help you get it right the first time. Visit Super Rack to explore our range of cattle yard solutions and get a quote for your project.