Picture a warehouse floor in complete disarray. Stock is impossible to find, workflows are a mess, and safety is a distant memory. This isn't just inefficient—it's actively holding your business back. The right shelves for your warehouse aren't just bits of steel; they're the very backbone of your operation, the foundation for everything from inwards goods to final dispatch.
Why Your Warehouse Shelving Is Your Most Important Asset
It’s easy to see shelving as a simple storage fixture, but in reality, it’s one of the most powerful tools you have for driving operational excellence. A strategic shelving layout transforms your available space, smooths out your workflow, makes your workplace safer, and ultimately, boosts your bottom line. A well-planned system is a catalyst for efficiency, turning a chaotic space into a high-performance logistics hub.
Think of it as the circulatory system of your business. When it's clear and organised, everything just flows. Stock moves from delivery to storage and out to dispatch with barely a hitch. But a poorly designed system? That creates bottlenecks, grinds order fulfilment to a halt, and puts your team at risk.
The Foundation of Operational Success
Investing in the right shelves for a warehouse delivers real, tangible benefits that you'll feel across the entire business. It's one of the most critical decisions a warehouse manager can make, with a direct impact on day-to-day productivity and long-term growth.
The key advantages are clear:
- Maximised Space Utilisation: Good shelving lets you use the full vertical height of your warehouse. This can dramatically increase your storage capacity without needing to find a bigger, more expensive building.
- Improved Inventory Management: When every single product has its own designated spot, stocktakes become faster and far more accurate. This gives you better control over your inventory and cuts down the risk of lost or misplaced goods.
- Enhanced Safety and Compliance: Properly installed, high-quality shelving minimises the risk of collapses and accidents. This ensures a safer workplace for your team and keeps you compliant with Australian safety standards.
At Super Rack, we get this better than anyone. We supply superior quality, competitively priced shelving solutions designed to meet these challenges head-on. With fast, nationwide delivery and expert advice, we're here to be your partners in building a more efficient and profitable warehouse.
Ready to transform your warehouse operations? Contact the Super Rack team today for a free consultation and let's find the perfect shelving solution for your business.
Understanding the Different Types of Warehouse Shelves
Choosing the right shelves for a warehouse can feel a bit overwhelming, but it’s much simpler once you get a handle on the main types. Think of it like picking a tool from a toolbox; you need the right one for the job. You wouldn't use a small spanner to change a truck tyre, and the same logic applies here. Each shelving system is engineered for a specific purpose, offering unique benefits for different products and workflows.
Getting this choice right from the start is fundamental to running an efficient and safe operation. The right system can dramatically improve your storage density, speed up picking times, and make sure your team can work safely. It’s not just about holding goods; it’s about creating a system that works for your business.
Selective Pallet Racking: The All-Rounder
Selective pallet racking is the most common type of warehouse shelving in Australia, and for good reason. Imagine it as a giant library for your pallets. Every single pallet gets its own dedicated spot and can be accessed directly by a forklift without having to shift anything else out of the way. This direct access makes it perfect for businesses with a huge variety of products (many SKUs) and high turnover.
This system offers what's known as 100% selectivity, meaning every pallet is immediately available. This is crucial for operations where speed is everything, like in fast-moving consumer goods (FMCG) or third-party logistics (3PL) warehouses. If you need to get to any pallet at any time, selective racking is your go-to. To see how this system could fit your space, you can learn more about our pallet racking solutions.
The following infographic shows how the correct shelving directly impacts the core functions of your warehouse.

As you can see, a smart shelving choice connects directly to better efficiency, stronger safety, and ultimately, a healthier bottom line.
Drive-In and Drive-Through Racking: For Maximum Density
Now, let's switch gears. What if you store massive quantities of the exact same product? Think of a beverage company with thousands of pallets of the same soft drink. In this case, direct access to every single pallet isn't the priority. This is where drive-in and drive-through racking really shine.
Think of drive-in racking as a high-density filing cabinet for pallets. Forklifts drive directly into the racking structure to place or retrieve pallets, which sit on rails. This gets rid of the aisles between each row, allowing you to cram far more product into the same footprint. It’s ideal for a Last-In, First-Out (LIFO) inventory system, making it perfect for non-perishable goods or bulk materials.
Drive-through racking is similar but lets forklifts enter from one end and exit from the other, enabling a First-In, First-Out (FIFO) flow. This is essential for products with expiry dates, like food and pharmaceuticals.
Real-World Example: A cold storage facility needs to maximise its expensive, temperature-controlled space. By using drive-in racking, they can store up to 75% more pallets compared to selective racking, seriously cutting their cost-per-pallet position.
Longspan Shelving: The Versatile Option
Not everything in a warehouse comes neatly stacked on a pallet. For storing smaller, hand-loaded items like spare parts, archive boxes, or e-commerce orders, longspan shelving is the perfect fit. It’s a strong, versatile, and adaptable system designed for manual picking.
Longspan is like the heavy-duty version of what you might have in your garage. It features wide, open spans that can hold bulky or awkwardly shaped items with ease. Because you don't need a forklift, it's perfect for picking areas, workshops, or retail back-of-house storage. Its simple, boltless design also means it can be easily adjusted as your needs change, offering great flexibility down the track.
Mezzanine Floors: Unlocking Vertical Space
What happens when you run out of floor space but still have high ceilings? The answer is to build up, not out. A mezzanine floor is basically an intermediate level built between the main floors of a building. It can effectively double your usable space without the massive cost and headache of moving to a bigger facility.
A mezzanine can be used for all sorts of things:
- Extra Storage: Install longspan shelving or even light-duty racking on top.
- Office Space: Create admin offices that overlook the warehouse floor.
- Work Areas: Set up packing stations or light assembly lines away from the busy ground floor.
At Super Rack, our expert team can provide advice on the best shelves for a warehouse operation like yours, ensuring you get a system that is safe, efficient, and competitively priced.
How to Choose the Right Shelves for Your Warehouse
Choosing the right **shelves for a warehouse** is about much more than just filling an empty space. It’s a strategic move that has a direct impact on your efficiency, safety, and ultimately, your bottom line. The best choice slots right into your operational DNA, supporting the way you handle products from the second they arrive to the moment they leave.
Making this call requires you to think like a strategist. You need a practical framework to make sure your investment pays off for years to come. That means taking a good, hard look at your products, your internal processes, and the physical realities of your building.
Analyse Your Product Profile First
The first step is always to understand exactly what you’re storing. The weight, size, and shape of your goods will dictate the type and strength of the shelving you need. Don't guess here—get the precise specs of your heaviest and bulkiest items.
This information is what you'll use to figure out the Safe Working Load (SWL) required for your system. The SWL is the maximum weight a shelf or racking bay can safely handle, and overloading is one of the biggest safety hazards in any warehouse. Getting this right is completely non-negotiable.
For instance, a business shipping light e-commerce goods in cardboard boxes has vastly different needs from a building supplier handling long, heavy packs of timber. That timber supplier would need a specialised system like heavy-duty cantilever racking, which is engineered to manage awkward, hefty loads safely. You can see what these systems look like with our heavy-duty cantilever racking sets.
Match Shelving to Your Inventory Flow
How fast does your stock move? The way you manage inventory turnover is a huge factor in picking the right shelving. The two most common methods are FIFO and LIFO.
- FIFO (First-In, First-Out): This method makes sure the first items that came in are the first to go out. It's critical for perishable goods like food or pharmaceuticals, where expiry dates matter. Pallet flow racking or drive-through systems are perfect for supporting a FIFO workflow.
- LIFO (Last-In, First-Out): This approach is used for non-perishable goods where the order of sale isn't important. Drive-in racking is a classic LIFO solution because it packs stock in tight, allowing the last pallet stored to be the first one picked.
To get your operations running like a well-oiled machine, it's smart to pair effective shelving with solid inventory management principles. These 10 Inventory Management Best Practices can help you align your systems perfectly.
Work with Your Building’s Footprint
Every warehouse building has its own quirks. You have to design your shelving layout to work with your space, not fight against it. Get out the tape measure and map out your facility, paying close attention to a few key details.
Your goal is to maximise every cubic metre, not just the square metres. This means thinking vertically and planning around obstacles to create a seamless flow for both people and machinery.
Keep these critical factors in mind:
- Ceiling Height: The clear height—the distance from the floor to the lowest overhead obstruction—determines how high you can build your racks. Taller racks mean more storage without needing more floor space.
- Floor Space: Measure the total available area, but also pinpoint any obstructions that will get in the way.
- Column Placement: Support columns are a fixed reality. Your layout has to work around them efficiently, making sure they don’t create dead zones or block forklift access.
- Dock Door Locations: It makes sense to position your fastest-moving stock in shelving closest to your inwards and outwards doors. This cuts down on travel time for your forklifts and speeds up the whole process.
At Super Rack, our team are experts in helping you analyse these factors to design a system that works for your specific needs. With our nationwide service, fast delivery, and superior quality products, we provide practical, long-lasting solutions at competitive prices.
Designing a Warehouse Layout for Peak Productivity
A smart layout does more than just fit shelves into your warehouse; it turns the entire space into a high-performance machine. The right design can slash order picking times, shrink forklift travel distances, and create a much safer place for your team to work. This is where your shelving system truly comes alive, moving beyond simple storage to become the backbone of your day-to-day workflow.
It all comes down to thoughtful planning. Taking the time to think it through can unlock hidden efficiencies you never even knew were possible. It’s about looking past the racks themselves and thinking about how your people, equipment, and stock will move through the space, day in and day out. A great layout makes every process, from receiving goods to dispatching orders, as smooth as it can be.
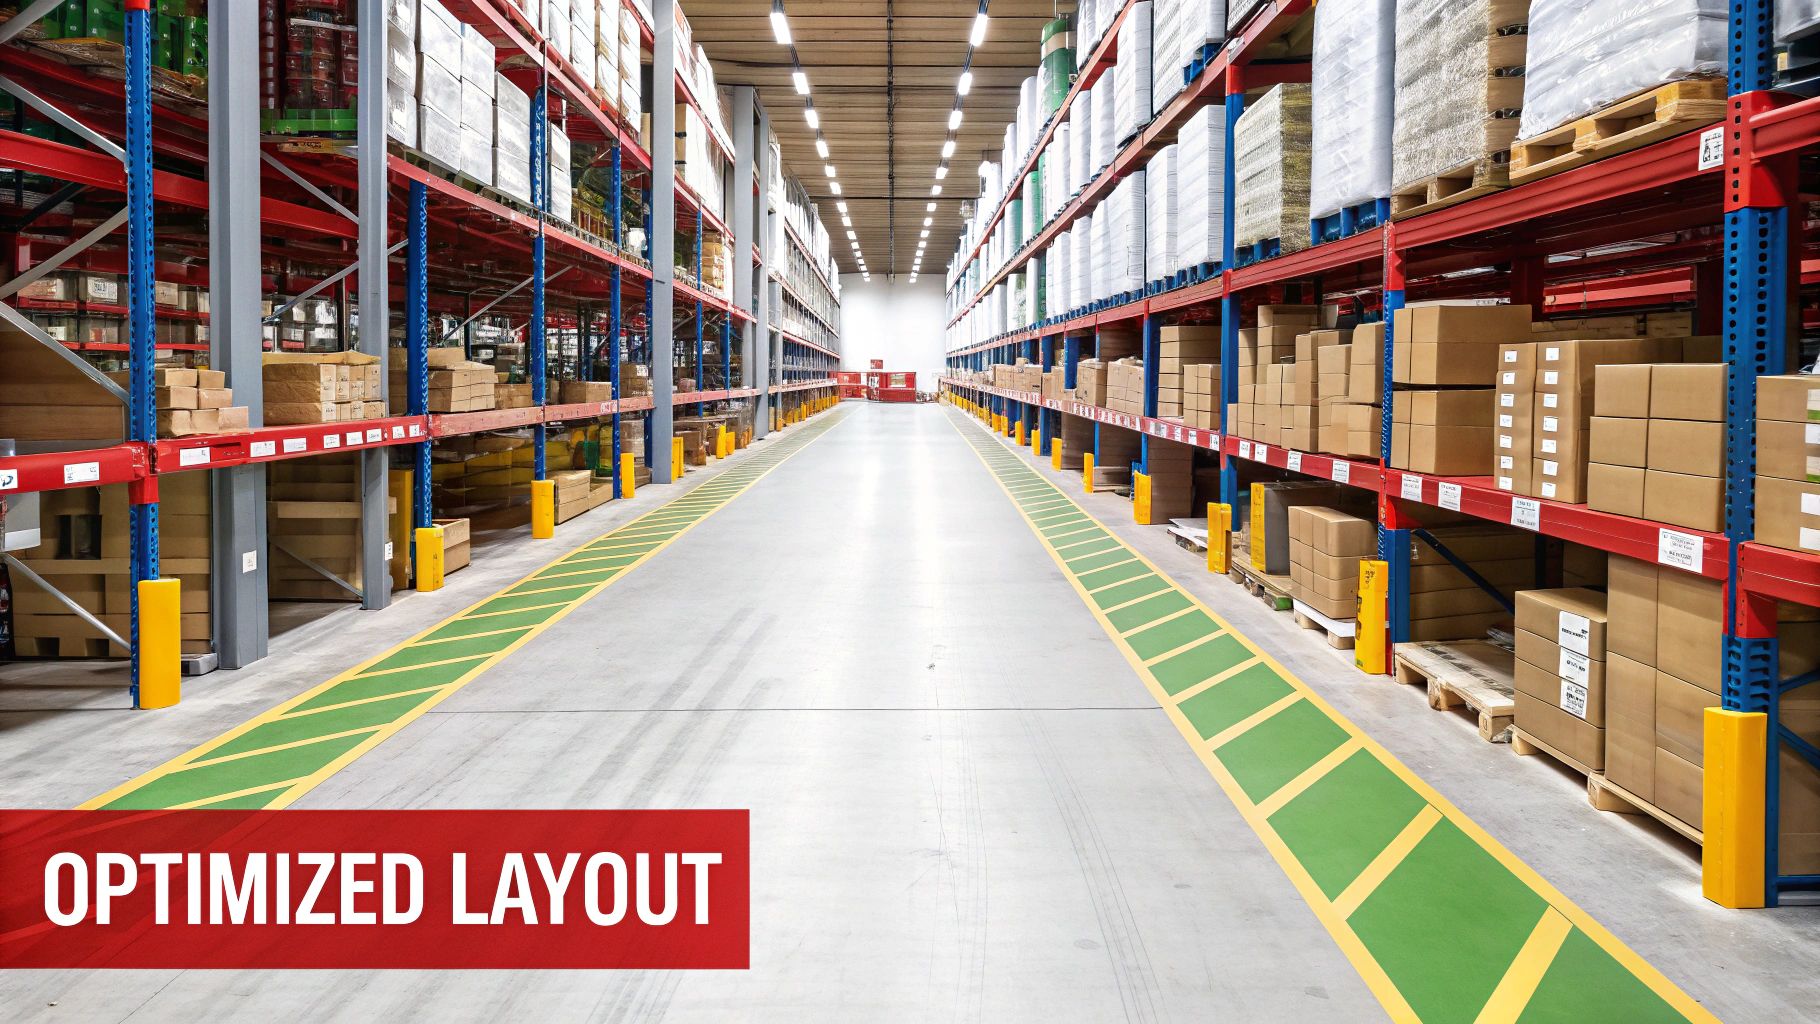
Calculating the Perfect Aisle Width
Deciding on your aisle width is one of the most critical calls you'll make. Get it wrong, and you’re setting yourself up for constant bottlenecks, damaged equipment, and a serious drag on productivity. The right width really just depends on the gear you're using to move stock around.
- Standard Forklifts: These counterbalance forklifts need the most room to move, typically requiring aisles between 3.5 to 4.5 metres wide to turn and operate safely.
- Reach Trucks: A bit more agile, these can work comfortably in aisles around 2.5 to 3 metres wide, which lets you pack your racking in a bit tighter.
- Narrow Aisle (VNA) Trucks: If you want to absolutely maximise your floor space, Very Narrow Aisle trucks can operate in gaps as tight as 1.8 metres, but they do require specialised equipment and guidance systems.
Before you lock anything in, always check the manufacturer’s spec sheet for your equipment's minimum turning radius and add a bit of a buffer for safety. It’s a small step that prevents big, costly mistakes down the line. To keep things flowing smoothly, it’s also a great idea to implement clear warehouse floor marking guidelines to guide traffic and improve safety.
Creating High-Efficiency Golden Zones
Let’s be honest, not all of your inventory moves at the same pace. A clever layout strategy is to place your fastest-moving, highest-turnover items in the most accessible spots. This is how you create what we call 'golden zones'.
These prime real estate spots are usually located closest to your packing and dispatch areas. By putting your best-sellers on shelves right there, you chop down the distance your pickers and forklifts have to travel for the majority of your orders. It’s a simple change that can make a massive difference in how quickly you get orders out the door.
One study of warehouse operations found that a picker can spend up to 50% of their time just travelling between locations. By strategically placing your most popular items, you reclaim a huge chunk of that time and give productivity a direct boost.
Maximising Vertical and Overlooked Space
Floor space is finite, but the space above your head is often completely wasted. To get the most storage density, you need to think vertically. That means choosing shelves for your warehouse that are tall enough to take full advantage of your building's ceiling height.
And don't forget about those awkward, seemingly unusable areas. The space above dock doors, for example, is often perfect for shelving that can hold slow-moving items or extra packaging supplies. If you've got plenty of height to work with, a custom-designed mezzanine floor can literally double your usable floor space without the massive cost and hassle of moving to a bigger facility.
Here at Super Rack, our team has the expertise to help you design a layout that truly works for you. We provide top-quality, competitively priced shelving solutions and service right across the country, making sure your warehouse is set up for peak performance from day one.
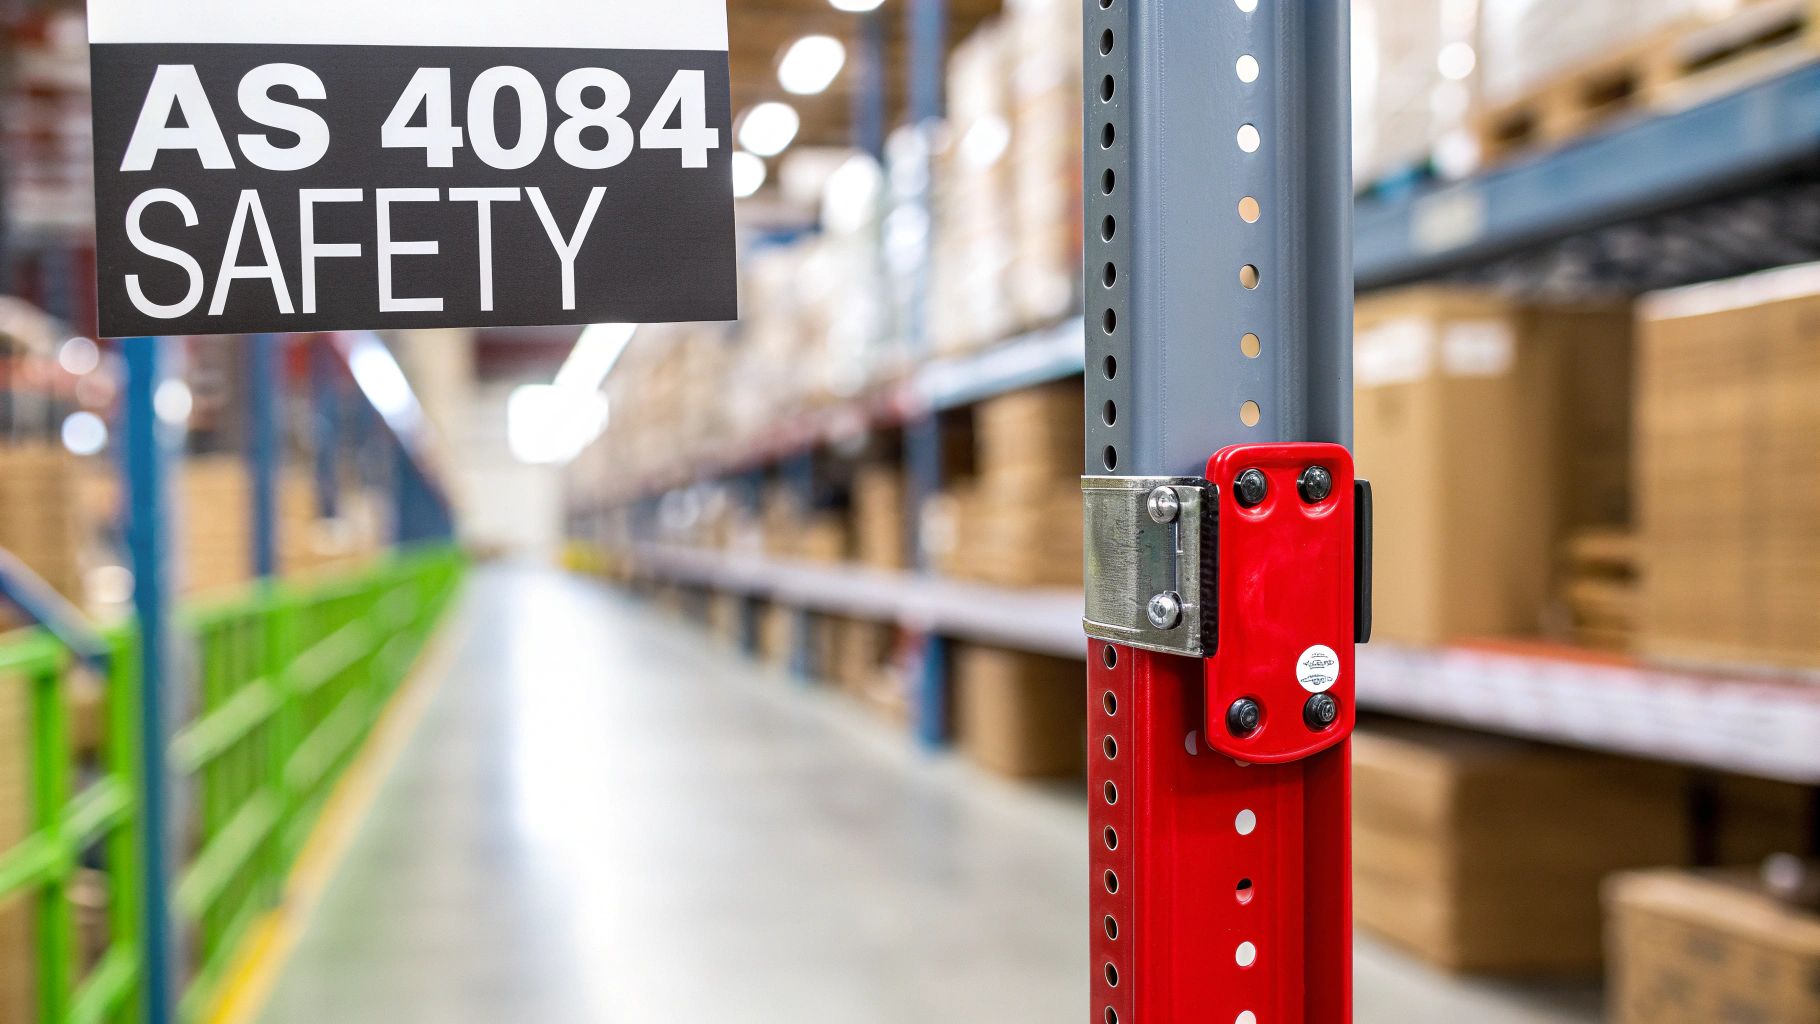
Meeting Safety and Compliance with Australian Standards
In any Aussie warehouse, safety isn’t just a nice-to-have—it's the law. Your shelving system is often the biggest and heaviest piece of equipment in the entire building, and keeping it structurally sound is absolutely essential for protecting your team, your stock, and your business. The gold standard here is Australian Standard AS 4084:2023 for steel storage racking. If you’re not meeting it, you’re not compliant.
This standard isn't just about ticking boxes or creating paperwork. It's a rock-solid, practical guide designed to prevent catastrophic collapses. A racking failure can lead to horrific injuries, massive stock losses, and fines that could cripple a business. Getting your head around the basics of AS 4084 helps you create a genuinely safe workplace and make smart calls about your shelves for warehouse infrastructure.
Key Compliance Requirements You Must Know
Sticking to AS 4084 means taking on a few critical responsibilities. These aren’t just friendly suggestions; they're the core practices that keep your racking safe and your people out of harm's way.
Here are the three big ones you can't ignore:
- Clear Load Rating Signage: Every single racking bay needs a professionally made sign showing its Safe Working Load (SWL). It must clearly state the maximum weight per pallet and the total load for the entire bay. This isn't optional—it has to be highly visible to every forklift operator and warehouse worker.
- Professional Installation: The strength of your shelving system is only as good as its assembly. AS 4084 is clear that racking must be installed by qualified people who follow the manufacturer's exact instructions. This is the only way to guarantee every component is fitted, levelled, and anchored correctly to prevent instability.
- Regular, Documented Inspections: The standard requires a formal inspection by a qualified professional at least once every 12 months. On top of that, your own team should be doing frequent visual checks to spot any early signs of damage.
Identifying Hazards Before They Become Disasters
Damage to warehouse shelving happens all the time, usually from small bumps and scrapes with a forklift. The real danger is brushing off what looks like a minor issue. A slightly bent upright or a sagging beam might not seem like a big deal, but it seriously weakens the load-bearing capacity of the entire structure.
A proactive approach is everything in warehouse safety. Finding and fixing minor damage straight away is far safer—and cheaper—than cleaning up after a major collapse.
Get your team trained to spot these common red flags:
- Deflected Beams: If a beam is visibly sagging or bowing under a load, it's a clear sign of overloading.
- Damaged Uprights: Keep an eye out for dents, twists, or buckling in the vertical posts, especially down low where most impacts occur.
- Missing Safety Clips: These little clips are crucial. They stop beams from being accidentally knocked out of place by a forklift. If they're gone, the beam isn't secure.
The scale of modern warehousing shows just why these standards are so vital. One new distribution centre in Australia recently installed enough racking for 66,000 pallet positions. Imagine the consequences of a failure in a facility that size. You can read more about the growth of the Australian warehousing market and what it means for large-scale operations.
At Super Rack, all our shelving and racking systems are engineered to meet or exceed Australian Standards. We provide top-quality, compliant solutions at great prices, all backed by expert advice and service right across the country.
To make sure your warehouse is fully compliant and your team is safe, contact Super Rack's safety experts today for help with inspections and system upgrades.
Beyond the Purchase: Installation, Maintenance, and Protecting Your Investment
Buying top-quality shelving for your warehouse is a great first step, but the real win comes from protecting that investment for the long haul. Getting the installation right and keeping up with maintenance aren't just tick-box exercises—they're fundamental to your safety program and asset management. A smart, proactive approach doesn't just extend the life of your racking; it prevents expensive downtime and keeps your team safe.
From the moment it's assembled to its day-to-day use, this is where a superior shelving system really shows its value. Well-made racking is built to last, but even the toughest systems need proper care to perform safely year after year.
The Critical Role of Professional Installation
It can be tempting to handle the installation yourself to save a bit of cash, but this is one area where cutting corners can have disastrous results. Think of professional installation as a non-negotiable investment in the safety and structural integrity of your entire warehouse. One incorrectly fitted beam or a poorly anchored upright can compromise the whole system, leading to instability or even a collapse.
At Super Rack, our experienced installers make sure every single component is fitted, levelled, and anchored exactly as the manufacturer intended and in line with strict Australian Standards. It’s about giving you total peace of mind that your system is safe and ready for work from day one.
A Practical Maintenance Checklist for Your Team
Your team is your first line of defence. Empowering them to spot issues early is the best way to prevent accidents, and it doesn't need to be complicated.
Encourage your staff to keep an eye out for these key warning signs as they go about their day:
- Damaged Uprights: Look for any dents, twists, or scrapes on the vertical posts. Pay close attention to the bottom metre, as this is where most forklift impacts happen.
- Bent or Sagging Beams: If a beam is visibly bowing under a load, it's a massive red flag for overloading. It needs to be unloaded and inspected immediately.
- Missing or Damaged Safety Pins: These little clips are what stop beams from being accidentally knocked out of place. A quick check to ensure they're all there and secure is crucial.
- Signs of Rust or Corrosion: Rust isn't just a cosmetic issue; it weakens the steel and can seriously compromise the strength of your shelves for warehouse use.
This kind of vigilance is important for all types of storage. Even the home storage market, a huge and growing sector in Australia, relies on these same principles of safety. The Australian home storage market was valued at around AUD 675.2 million and is set to grow even more, showing just how widespread the need for reliable storage is. You can discover more insights about this growing market and its impact.
A simple rule for your team: If you see something, say something. Reporting minor damage straight away allows for a quick fix, stopping a small problem from turning into a dangerous and costly failure.
Training Staff on Correct Loading Procedures
Finally, you can’t protect your investment without ongoing training. Make sure every forklift operator and warehouse worker knows the Safe Working Load (SWL) limits, which should be clearly displayed on your racking. Teach them the right way to load and unload to avoid accidental bumps and scrapes—because even a small knock can weaken the structure over time.
When you combine professional installation with a culture of regular checks and proper training, you guarantee your shelves for warehouse operations give you the best possible return and rock-solid safety for years to come.
Ready to ensure your shelving is installed correctly and maintained for peak performance? Contact the Super Rack experts today for professional installation services and safety advice.
Your Warehouse Shelving Questions, Answered
Making a big investment in your warehouse setup always comes with a few questions. To help you move forward with confidence, we’ve put together clear, straightforward answers to some of the most common queries we hear from warehouse managers.
How Do I Know the Maximum Weight My Shelves Can Hold?
You don't have to guess. Every compliant racking system in Australia is required to have a ‘Safe Working Load’ (SWL) sign clearly displayed, as mandated by Australian Standard AS 4084. This sign spells out the maximum weight allowed for each pallet and for the entire bay. Going over these limits isn't just risky—it's illegal.
When you work with Super Rack, our team calculates your specific load requirements and provides certified SWL signage with every single installation. It’s our way of making sure you can operate safely and trust your equipment completely.
Can I Mix Components from Different Racking Brands?
This is a definite no-go. We strongly advise against it because it's an incredibly dangerous practice. Racking components are engineered to work together as a complete, integrated system. When you mix beams and uprights from different manufacturers, you create a dangerously unstable structure.
Think about it: their locking mechanisms, steel grades, and engineering tolerances are almost certainly different. This mismatch voids warranties and dramatically increases the chances of a catastrophic structural failure. Always stick with a single, trusted supplier for all your components to guarantee safety and integrity.
How Often Should I Have My Warehouse Racking Inspected?
Australian standards are clear on this: you need a formal inspection by a qualified professional at least once every 12 months. But safety doesn't stop there. Your own team should be doing frequent visual checks—think weekly or monthly—to spot any obvious damage like dents, corrosion, or missing safety pins.
If you find a damaged component, it needs to be unloaded immediately and reported for professional repair or replacement. Don't wait.
What Is the Main Difference Between Pallet Racking and Longspan Shelving?
The biggest difference comes down to how you use them. Pallet racking is the heavy-duty workhorse of the warehouse, built specifically for storing full pallets that are loaded and unloaded with a forklift. It’s all about bulk storage.
Longspan shelving, on the other hand, is a versatile, medium-duty system designed for items you load by hand. It's perfect for individual boxes, spare parts, and any non-palletised stock. While they might look a bit similar, longspan is your go-to for picking areas and workshops, while pallet racking is for high-volume, machine-handled goods.
At Super Rack, we don’t just sell shelves; we provide the expert advice and high-quality solutions you need to build a warehouse that’s safe, efficient, and fully compliant. Our team is ready to guide you through the whole process, from the initial design sketches to professional installation and ongoing safety checks.
Explore our complete range of warehouse storage solutions at Super Rack today!