Turning a cluttered garage into a proper workshop is a game-changer, and it all starts with a smart plan. A good garage workbench and storage system does more than just get things off the floor—it carves out a safe, organised space where you can actually get work done.
Planning Your Ultimate Garage Workshop
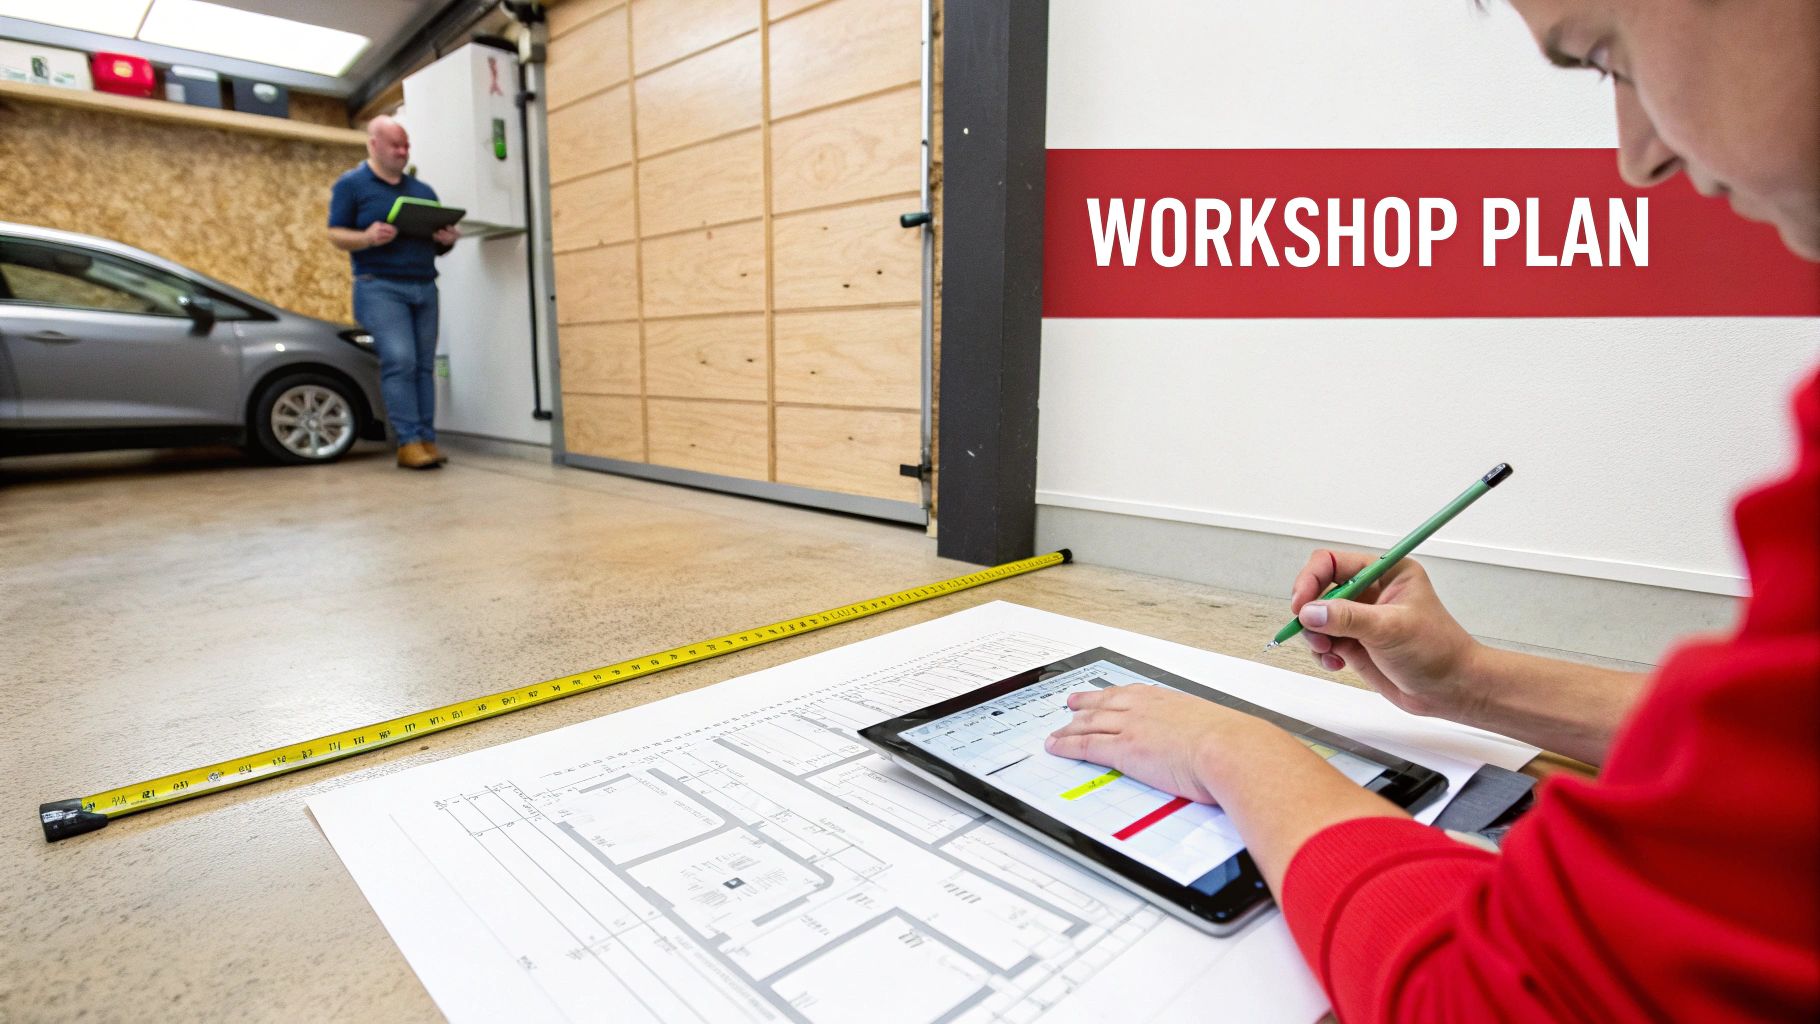
Before you even look at a new workbench, the first—and most important—job is to properly understand your space. A great workshop doesn't just happen; it's born from careful planning and accurate measurements. Getting this right from the start saves a world of headaches later, ensuring everything fits and functions just the way you need it to.
First up, grab a tape measure and get the real dimensions of your garage. Length, width, and ceiling height are the basics. But don't stop there. Pinpoint the locations of every power outlet, window, and light switch. There’s nothing worse than setting up the perfect workbench only to realise it’s blocking the only available power point.
Measure Twice, Organise Once
Think about how you’ll actually move around in the space. How much room do you really need around your car? It's a classic mistake to forget about car door clearance. Swing your doors wide open and measure how much space they take up. You need to be able to get in and out without squeezing past your new shelves.
Next, check your floor. A lot of Aussie garage floors have a slight slope for drainage, which can leave a workbench or shelving unit wobbly and unsafe. A quick check with a spirit level will tell you if you need to plan for adjustable feet or shims to get everything solid. Since the workshop will see a lot of foot traffic and heavy gear, having a solid foundation is crucial. You might even want to look into durable flooring for high-traffic areas.
This infographic breaks down a simple three-step approach to get your plan rolling.

As you can see, jumping from measurements to a quick sketch helps you visualise the final layout and spot potential problems before you spend a cent.
Define Your Workshop's Purpose
What are you actually going to be doing in there? The answer will completely shape your workbench and storage needs.
- The Car Enthusiast: You'll need a heavy-duty steel workbench that can stand up to grease, oil, and the sheer weight of engine components. For example, a bench strong enough to hold a gearbox while you work on it. Deep drawers for socket sets and heavy-duty shelving for tools are non-negotiable.
- The Woodworker: A big, flat timber-top workbench is your best friend. You'll want your saws, sanders, and clamps within easy reach, plus dedicated shelving for different types of timber and supplies.
- The All-Rounder: If you just need a solid spot for household fixes and weekend DIY projects, a versatile bench with built-in drawers and a pegboard for your everyday tools is probably the perfect solution.
The push for better-organised workspaces is huge right now, especially in the automotive world. Australia's auto repair industry is now home to over 63,000 businesses and pulls in more than $10 billion a year, with independent workshops making up a massive slice of that. That kind of growth shows just how vital an efficient setup is for keeping up with demand.
Having a clear plan makes it so much easier to find the best garage storage systems for your specific projects, making sure you get it right the first time. At Super Rack, our advantage is offering expert advice to help you design a layout that truly works, backed by our nationwide service and fast delivery to get you started.
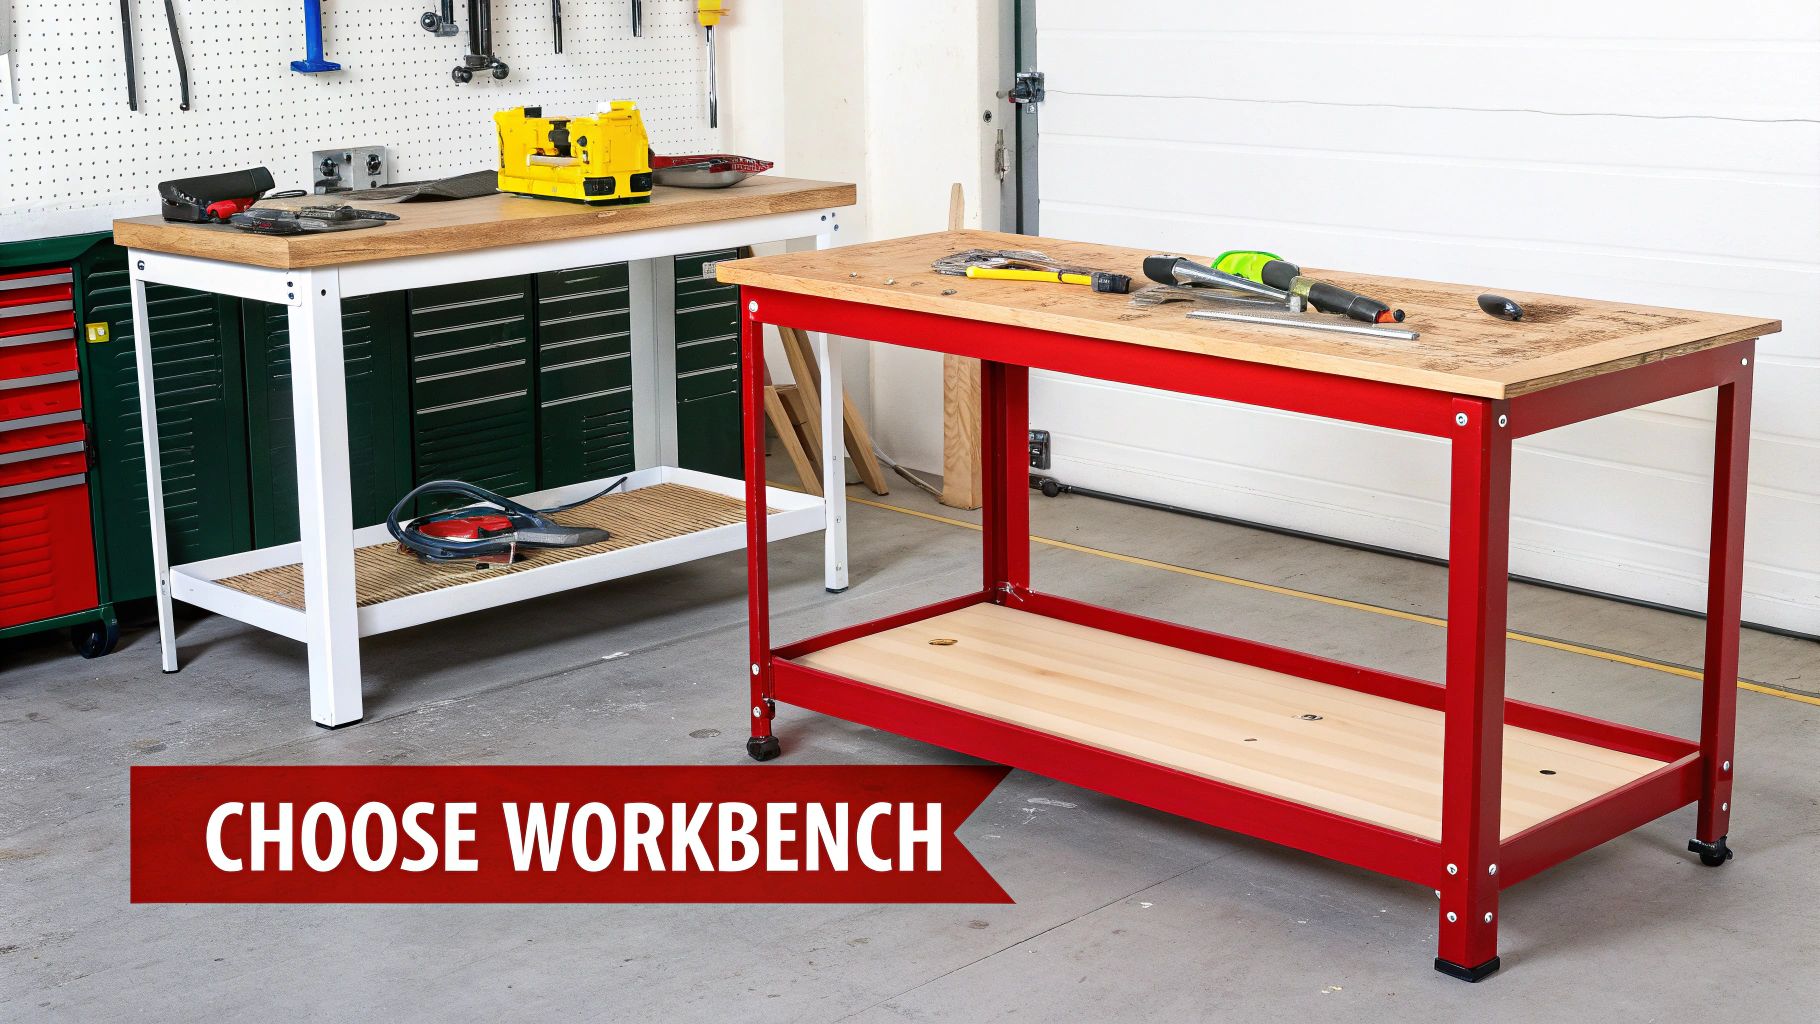
Choosing The Right Workbench For Your Projects
A workbench is more than just a table; it's the heart of your workshop. It's where ideas take shape and where you'll spend countless hours tinkering, fixing, and creating. Picking the right one isn't just about finding something that fits the space—it's about matching the bench to your projects and making sure it's tough enough to last.
Think of your garage workbench and storage system as a long-term investment in your productivity. The right bench provides a stable, durable surface that’s built for the work you do.
Understanding Materials and Construction
It all comes down to two things: the frame and the benchtop. The materials used here will tell you everything you need to know about what the workbench is built for.
When it comes to heavy-duty work, a steel frame is the clear winner. It delivers the strength and rigidity you need for mechanical jobs, metalworking, or mounting gear like a bench vice or grinder. At Super Rack, our workbenches are constructed with superior quality steel, giving you a rock-solid foundation that won’t wobble under pressure—all at a competitive price that makes sense.
The benchtop is just as crucial.
- Timber or MDF: These are fantastic all-rounders for general DIY, electronics, or woodworking. They won't conduct electricity, they're more forgiving if you drop a tool, and you can easily clamp things down. A timber top just feels like a classic, reliable workspace.
- Steel: If you're doing automotive work or anything involving oils, chemicals, or welding, a steel top is a must. It’s tough as nails, fire-resistant, and super easy to clean. You can wipe away grease and spills without a second thought.
For many people, a steel-framed bench with a replaceable timber or MDF top is the perfect combo. You get the brute strength of steel with a practical work surface you can refresh down the track.
What Does Load Capacity Really Mean?
You see load capacity ratings thrown around, but what do they mean in the real world? A 500kg rating doesn't just mean the bench can hold a static 500kg lump in the middle. It means the entire structure can safely handle that weight distributed across it, plus the dynamic forces you create while working.
Think about it: hammering, sawing, or wrenching on a vice adds a ton of downward and sideways force. A high load capacity ensures your workbench stays put and remains safe, not just acting as a heavy-duty shelf.
A light-duty bench rated for 150kg might be fine for small craft projects. But if you're pulling apart an engine or fabricating with heavy steel, you’ll need a bench rated for 500kg, 1000kg, or more. Always go for a capacity that gives you plenty of headroom for your biggest jobs.
Features That Boost Functionality
Beyond the frame and top, the right features can make your workflow so much smoother.
Integrated Storage: Drawers and lower shelves are non-negotiable for keeping your space organised. A bench with built-in drawers puts your most-used hand tools, screws, and measuring tapes right where you need them. No more walking back and forth to a separate toolbox. It's a key part of an efficient garage workbench and storage setup.
Adjustability and Mobility: An adjustable height workbench can be a game-changer for your back, letting you set the perfect height whether you're standing or sitting. And if your workshop layout changes often, a sturdy workbench with wheels offers incredible flexibility, letting you move your workspace wherever it's needed most.
Choosing the right workbench is about investing in a tool that supports you on every project. By looking at the materials, understanding what load capacity actually means, and picking features that suit your work, you’ll find a reliable partner for years to come.
Integrating Smart Storage Around Your Workbench
A great workbench is only half the battle won; it needs a smart, cohesive storage system built around it to truly shine. Creating a seamless flow between your tools, materials, and workspace is what turns a good garage into a highly efficient one. It's about building a complete garage workbench and storage ecosystem where everything has its place.
This approach transforms your garage from a simple dumping ground into a productive workshop. You'll spend less time hunting for that 10mm socket and more time actually getting the job done.
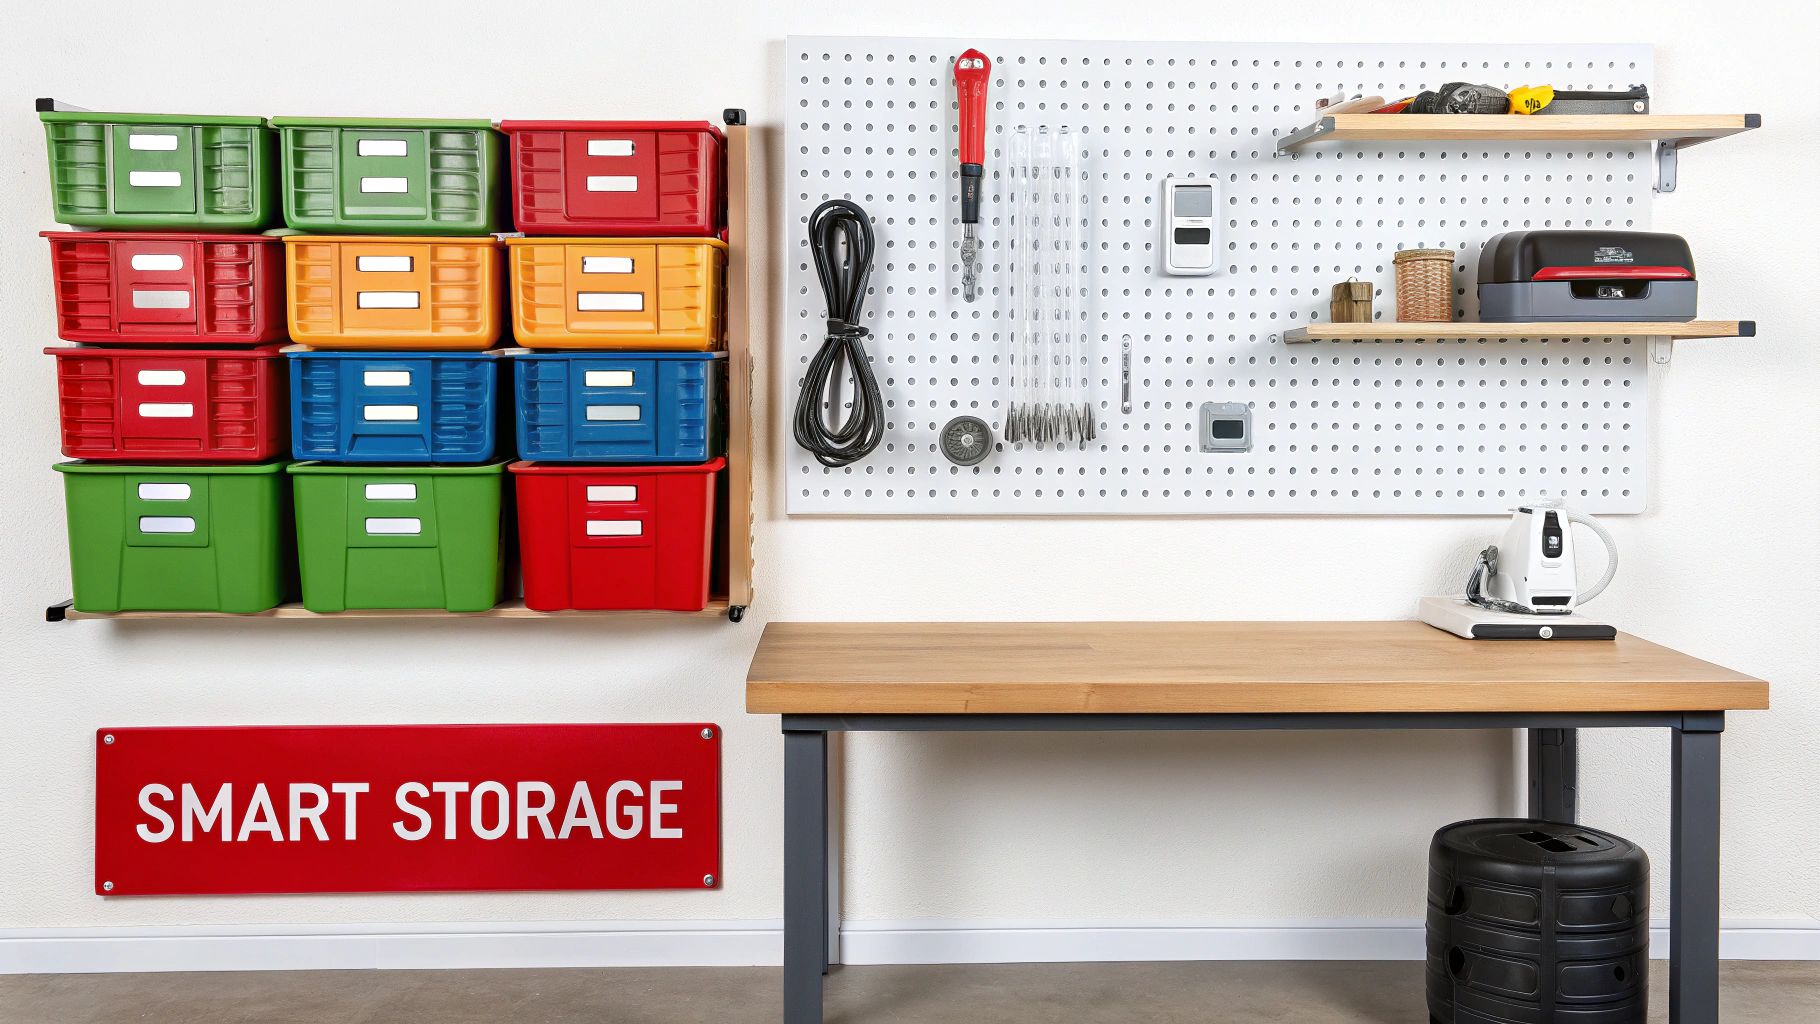
Building Up with Vertical Storage
Look up. Your garage walls and the space above them are your greatest untapped storage assets. Using them effectively frees up precious floor space and keeps your most-used tools within arm’s reach.
Vertical storage is the key to conquering clutter. Think about getting items off the floor and into organised, accessible spots.
- Heavy-Duty Shelving: For bulky items like power tool cases, paint tins, and storage bins, strong steel shelving is a must. Stick a unit right next to your workbench to keep project-specific gear close by.
- Pegboards and Slat Walls: These are perfect for the wall directly behind your workbench. A pegboard gives you a customisable home for hand tools like spanners, screwdrivers, and pliers, keeping them visible and easy to grab.
- Wall-Mounted Accessories: Consider adding magnetic tool strips for frequently used items or small shelves for jars of nuts and bolts. Our guide to wall-mounted garage storage offers more ideas on how to squeeze every bit of value from this space.
The goal is to create a "cockpit" around your workbench. Everything you need for a task should be reachable with just a turn or a step, eliminating wasted movement and keeping your focus locked on the project.
The Power of Modular and Adaptable Systems
Your needs will change. You might pick up a new hobby or expand your tool collection, which is why a modular storage system is such a smart investment.
Modular systems, like those from Super Rack, allow your storage to grow and adapt with you. You can start with a basic workbench and shelving unit, then add extra bays, drawers, or wall accessories as your collection expands. This flexibility means you’re never locked into a single, rigid layout.
When you're mapping out your storage, think about whether you'll handle the install yourself or get a hand for tasks like installing closet shelves or other wall-mounted units.
Creating Dedicated Zones for Efficiency
A truly organised workshop uses zoning to create a logical workflow. This just means grouping similar items and activities together to create purpose-built areas within your garage.
For example, set up a dedicated zone just for your power tools. This could be a small section of your workbench with a multi-plug power board for charging batteries. That way, all your drills, drivers, and saws are fully charged and ready to go in one convenient spot.
Another no-brainer is a zone for small parts. Use clear, labelled bins or small drawer units for all your screws, nuts, bolts, and washers. This simple step can save you countless minutes of frustration rummaging through mixed containers.
This need for efficiency is driving growth everywhere. The Australian automotive repair industry, for instance, is set to grow by over 6% by 2025. With independent workshops now commanding 57% of consumer vehicle revenue, the pressure is on to work smarter, not harder. This has fuelled a massive demand for ergonomic and scalable workshop solutions, proving that smart organisation is a real competitive advantage.
By combining robust vertical storage, adaptable modular systems, and logical zoning, you can build a highly functional space around your workbench. Super Rack offers superior quality solutions at competitive prices, with fast nationwide delivery to help you get organised sooner.
A Practical Guide to Assembly and Installation
You’ve picked out the perfect garage workbench and storage system, and now comes the satisfying part: putting it all together. A solid installation isn’t just about following the booklet; it’s about doing the right prep work to make sure your new setup is rock-solid, safe, and ready for whatever you throw at it.
This guide will walk you through the process, giving you the practical advice you need to get the job done smoothly and build a workshop foundation that lasts.
Preparing Your Space for a Smooth Build
Before you even tear open the box, the single best thing you can do is prep your space. Trust us, a clean and clear area makes the whole process faster and safer, saving you from lost bolts and a whole lot of frustration.
Start by giving the spot a really good sweep. Get rid of all the dust, stray screws, and general clutter to create an open workspace. It’s not just about being tidy—it gives you a blank canvas and stops you from tripping over things while you're trying to concentrate.
Next, get a spirit level and check the floor where your workbench and shelving will live. We talked about this in the planning stage, but it’s worth repeating: most garage floors aren't perfectly level. If you find a slope, you'll need to use shims or adjustable feet to make sure your units are stable and don’t have any annoying wobbles.
Gathering Your Tools
There’s nothing worse than getting halfway through a build only to realise you don’t have the right spanner. Most flat-pack systems are designed for easy assembly, but having these essentials ready will make your life much easier:
- A good socket set or spanner set: Absolutely crucial for tightening all those nuts and bolts properly.
- A rubber mallet: Perfect for tapping beams into place without chipping the powder coat.
- A spirit level: You'll need this again to get your shelves and benchtop perfectly horizontal.
- A cordless drill with driver bits: This will seriously speed things up, but go easy—you don't want to over-tighten and strip the threads.
- Safety gear: A decent pair of gloves will save your hands from scrapes and pinches.
Lay everything out before you start. It saves you time and keeps the momentum going.
Assembling Your Workbench and Storage
Alright, your space is clean, your tools are ready—it’s time to build. While the exact instructions will differ between models, most steel garage workbench and storage units share a pretty similar assembly logic.
First up, lay out all the components and do a quick stocktake against the parts list in the manual. This five-minute check can save you a huge headache if you discover something is missing halfway through.
Pro Tip: When building shelving units, put the frame together first. Connect the uprights and crossbeams, but only tighten the bolts loosely. Once the whole frame is standing, go back and tighten everything up. This gives you a bit of play to make sure it's all perfectly aligned.
When it’s time to add the benchtop or shelving panels, double-check that they are sitting squarely in the beams. A poorly seated shelf is a weak shelf, and it can compromise the whole unit's stability.
The Final Step: Safety and Security
This is the most important step, especially if you have tall shelving units. You absolutely have to anchor them to the wall to eliminate any risk of them tipping over.
Most quality kits include brackets or have pre-drilled holes just for this. Find the studs in the wall behind your unit and use the right screws to fix it firmly in place. It's a simple act that adds a massive amount of stability and peace of mind, particularly if you have kids or a busy workshop.
The goal here is a sturdy, secure workspace. While assembly is usually straightforward, don't ever hesitate to ask for help if you're not 100% sure. At Super Rack, we don't just sell superior quality products; we back them up with expert advice and nationwide service. Our team is always here to give you the guidance you need to get it right the first time.
Organising Your New Workspace For Peak Efficiency
Alright, your new workbench and storage system is built and bolted down. Now for the best part: setting it all up to work for you. A well-organised space isn't just about looking tidy; it's about making every single task smoother, safer, and faster. This is where you fine-tune your workshop from a collection of gear into a high-performance workspace.
The whole idea behind smart workshop organisation is simple: keep what you use most within arm's reach and give everything else a logical home. This one principle completely changes how you work, turning your garage workbench and storage into a place where projects just flow.
Create Work Zones For A Better Flow
One of the most effective tricks is to create distinct 'zones' for different jobs. This simple layout strategy stops you from constantly shuffling tools and materials around, creating a much more natural workflow.
Think of it as giving every stage of a project its own dedicated spot.
- The Preparation Zone: This is your spot for measuring and marking. Keep your tape measures, squares, and pencils right there in a drawer or on a magnetic strip. No more hunting around.
- The Cutting and Fabrication Zone: Here's where the serious work gets done. It’s the part of your bench where you might have a vice mounted or keep your saws and grinders close by.
- The Assembly Zone: You need a clear, open section of your workbench just for putting things together. Keep your drivers, fasteners, and glues in labelled bins or small drawers right under this area.
- The Finishing Zone: This is for the messy stuff—sanding, painting, or oiling. It’s a good idea to keep this zone a little separate to stop dust and overspray from coating all your other tools.
When you zone your workspace like this, you create a logical path for any project, which keeps things organised without you even having to think about it. It’s a massive time-saver.
Clever Hacks For Smarter Storage
Once your zones are mapped out, a few clever storage tricks can make them even better. These little additions can have a huge impact on your day-to-day efficiency.
A well-organised space isn't just about finding things faster; it's about reducing 'decision fatigue'. When you don't have to think about where a tool is, you can put all your mental energy into the task at hand.
Here are a few practical ideas:
- Magnetic Strips: Absolutely brilliant for keeping frequently used hand tools—like spanners, screwdrivers, and pliers—visible and ready to grab in your main work zone.
- Clear, Labelled Bins: For all those small bits and pieces like screws, nuts, and bolts, clear containers are a non-negotiable. You can see what’s inside at a glance, and a simple label removes any guesswork.
- A Dedicated Charging Station: Get a power board and set it up in one corner just for your cordless tool batteries. It creates a single, organised spot for charging and means your tools are always ready when you are.
This push for efficiency is changing industries all over Australia. Just look at the automotive repair sector, where reforms like the Motor Vehicle Information Sharing Scheme have made a huge difference. Since it came in, 65% of independent repairers have seen productivity jump, and vehicle turn-aways have dropped by 40%. It’s proof that better workshop layouts and organised tool access lead directly to faster, more profitable work. You can discover more insights about these national productivity gains and see how efficient workspaces are playing a key role.
The Power Of The 'Clean Down' Routine
Finally, the single most important habit for keeping your workshop organised is the 'clean down' routine. It’s dead simple: at the end of every project or day, take five or ten minutes to put everything back where it belongs.
Wipe down your workbench, give the floor a quick sweep, and return your tools to their homes. This small bit of discipline stops the clutter from ever building up and makes sure your workshop is always ready for the next job.
Investing in a superior quality system from Super Rack makes this routine so much easier to stick to. With durable, well-designed storage, everything has a logical place, making the cleanup process quick and painless. Our expert team can help you design a layout that makes organisation feel effortless.
Got Questions About Garage Workbenches?
Even the most carefully planned project throws up a few questions. When it comes to setting up your dream garage workbench and storage, getting the right answers is key to making a choice you'll be happy with for years.
Here are some of the most common queries we get from customers, with practical, no-nonsense answers from our team.
How Much Weight Can A Garage Workbench Actually Hold?
This is the big one, and the answer really separates the serious gear from the weekend toys. A basic, light-duty bench you might find at a general hardware store could be rated for just 100-200kg. That's perfectly fine for tinkering with electronics or light craft work, but it's not going to cut it for heavier jobs.
If you're into serious DIY, car maintenance, or fabrication, you need something with real muscle. A heavy-duty steel workbench, like the ones we specialise in at Super Rack, can easily handle loads from 500kg to over 1000kg. Before you buy, think about the absolute heaviest thing you'll ever put on it. Mounting a big vice? Rebuilding a car engine? Don't skimp on the load capacity.
As a rule of thumb, always pick a workbench with a weight rating that’s comfortably more than you think you’ll ever need. It’s not just about holding static weight; it's about staying rock-solid and safe when you're sawing, hammering, or putting some real force into a job.
Do I Really Need to Bolt My Workbench and Shelving to the Wall?
Short answer: yes. For both safety and performance, we strongly recommend it. Bolting your workbench to the wall studs or even the concrete floor is a game-changer. It completely eliminates any annoying shifting, wobbling, or walking that can happen during heavy use, making the whole setup feel incredibly solid.
When it comes to tall shelving units, anchoring them to the wall isn't just a recommendation—it's non-negotiable. It's the single most effective step to prevent a dangerous tip-over accident, especially if you have kids or pets around. All good quality shelving and bench systems will come with pre-drilled holes or mounting brackets to make this a straightforward job.
What’s the Best Way to Protect My Workbench Surface?
A little bit of protection goes a long way in keeping your benchtop looking good and lasting for decades. The right approach depends on the benchtop material and the kind of work you do.
- For Timber Tops: A couple of coats of clear polyurethane is a simple weekend job that creates a tough, sealed barrier. It'll protect the wood from spills, grease stains, and general wear and tear.
- For Heavy-Duty Use: Go with a sacrificial layer. A sheet of cheap hardboard or a self-healing cutting mat can take all the abuse from drilling, cutting, and hammering. When it gets too beaten up, just swap it out for a new one. It's a brilliantly simple and affordable solution.
- For Steel Tops: While steel is incredibly tough, a heavy-duty rubber mat is a fantastic addition. It stops your tools from sliding all over the place, dampens noise from impacts, and protects both the steel surface and your delicate parts from scratches.
No matter what surface you have, giving it a regular wipe-down to get rid of oil, grease, and sawdust is the best habit you can get into.
Should I Get a Steel or a Timber Benchtop?
This really boils down to what you'll be using it for most. There's no single "best" option—they're just built for different tasks.
A timber top is the classic all-rounder, perfect for woodworking, assembling projects, and electronics. It’s naturally non-conductive, it's a bit more forgiving if you drop a delicate component, and it's super easy to clamp things to. It just feels right for general-purpose work.
A steel top, on the other hand, is the undisputed king for messy jobs. Think automotive repairs, welding, or anything involving oils, solvents, and chemicals. It’s nearly indestructible, fire-resistant, and incredibly simple to wipe clean.
For a lot of people, a strong steel-framed workbench with a replaceable timber or MDF top offers the best of both worlds. You get the unshakeable strength of a steel frame with a functional, versatile work surface you can easily refresh down the track.
Ready to build the ultimate garage workspace? The team at Super Rack is here to help with expert advice, superior quality products at competitive prices, and fast, nationwide delivery.
Explore our complete range of garage workbench and storage solutions at Super Rack