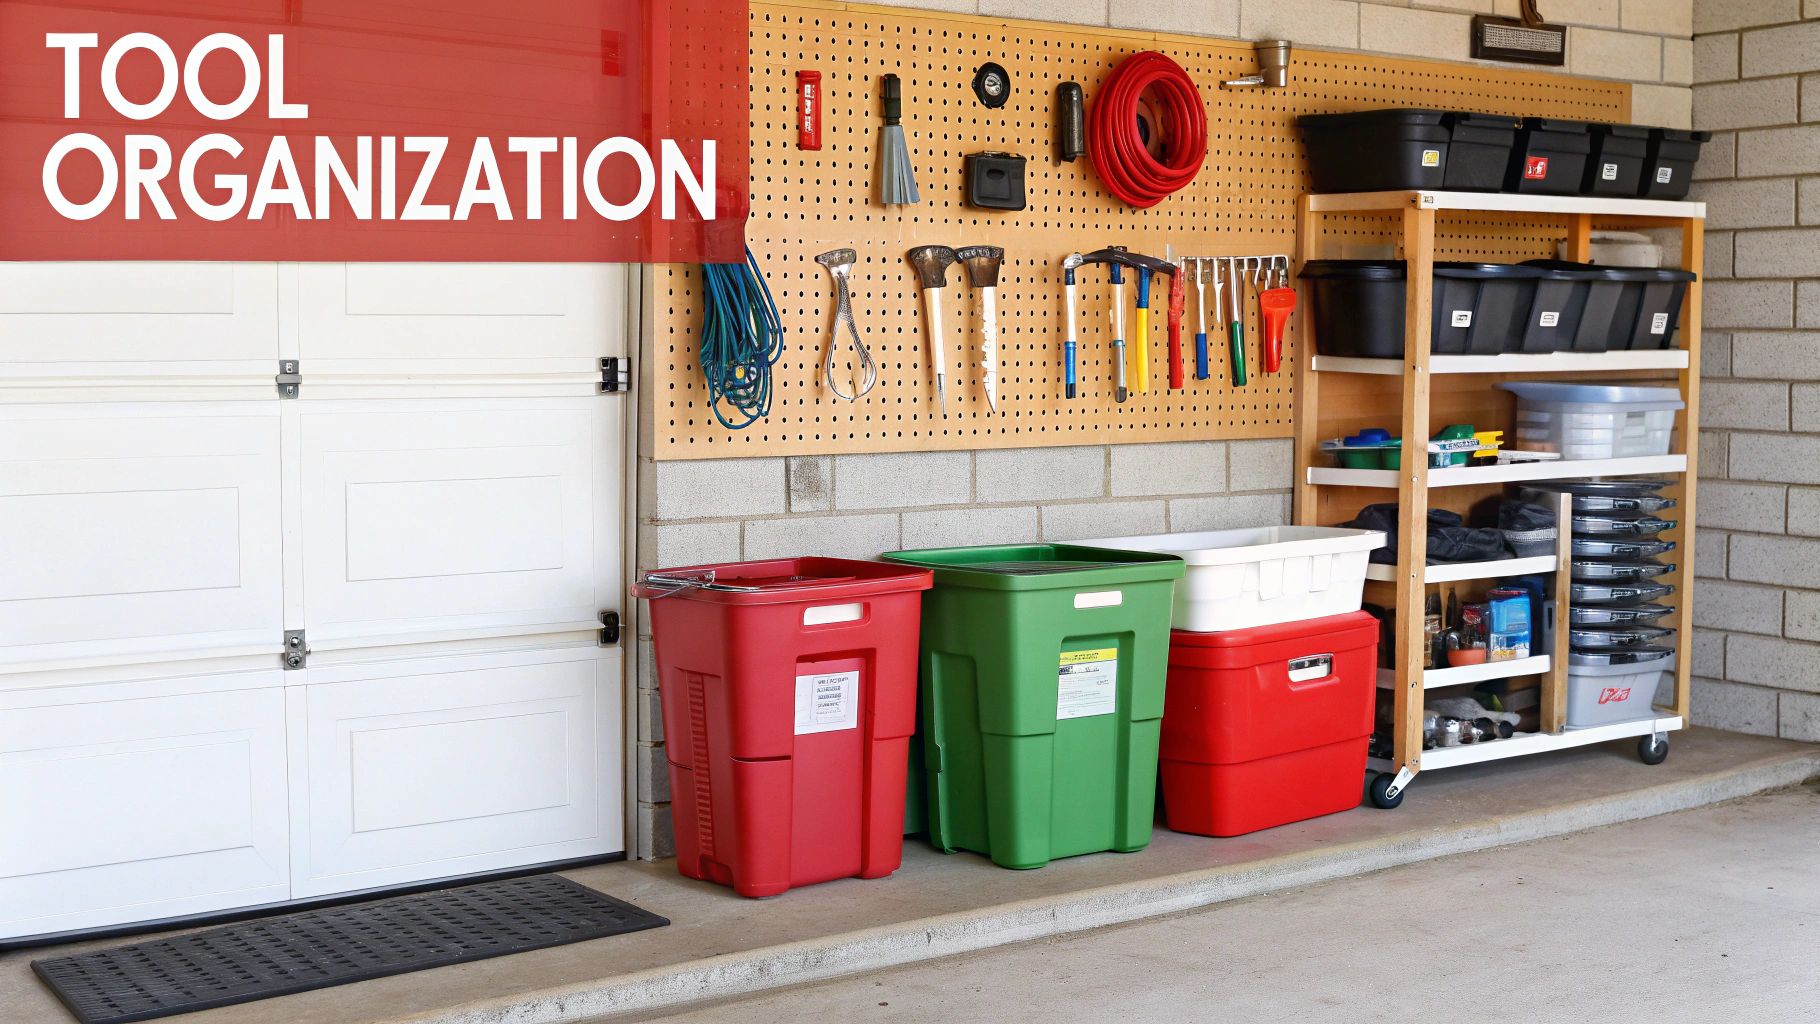
Let’s be honest, finding the right shelving for a garage is the difference between a chaotic dumping ground and a seriously functional workspace. It’s one of the simplest and most effective upgrades you can make to reclaim precious floor space, keep your gear safe, and actually find what you’re looking for without a ten-minute search party.
This guide is all about building a system that works for you, whether you’re a tradie with a van full of tools, a small business owner running stock from home, or a weekend warrior tackling your next DIY project.
Why Quality Shelving for a Garage Matters
A messy garage isn’t just an eyesore; it’s a productivity killer and a genuine safety risk. We’ve all been there—tripping over tools, wasting half an hour searching for that one specific drill bit, or nervously eyeing a wobbly stack of heavy boxes. Investing in proper shelving is the first real step to taking back control.
Think of it as laying the foundation for an efficient workshop or storage zone. Good shelving doesn’t just hold your stuff. It creates a proper system where everything has a home, completely changing how you use one of the most valuable parts of your property.
The Real Cost of a Messy Garage
The frustration of garage clutter is only the tip of the iceberg. If you’re running a business or working as a tradie, that disorganisation can hit you right in the wallet. Every minute spent hunting for misplaced equipment is a minute you’re not on the job earning. And tools left on a damp floor? That’s a fast track to rust and costly replacements.
A good shelving system solves these headaches instantly:
- Wasted Time: Forget digging through piles. A well-organised shelf means you can grab what you need and get straight to work.
- Damaged Gear: Getting tools, paint tins, and other supplies off the concrete floor is critical. It protects them from moisture, knocks, and accidental damage.
- Safety Hazards: A clear floor is a safe floor. Simple as that. You’ll reduce trip hazards and stop things from toppling over, making the garage safer for everyone.
- Lost Space: Your garage floor is prime real estate. By using the vertical space with shelving, you can easily double or even triple your storage capacity without taking up another square metre.
Super Rack Makes Organisation Easy
At Super Rack, we get it. We talk to Aussies dealing with these exact problems every single day. We’re firm believers that top-quality, heavy-duty shelving shouldn’t cost an arm and a leg. As an Australian-owned company, our mission is to provide tough, practical storage solutions backed by honest, no-nonsense advice.
We focus on delivering seriously good products, from rock-solid steel shelving to versatile storage systems, all at prices that make sense. With fast, nationwide delivery, getting your garage sorted has never been easier. Right, let’s get into choosing the perfect shelving to reclaim your space.
Exploring Your Garage Shelving Options

The first big decision you’ll make when sorting out your shelving for a garage is picking the right type. Get this part right, and you’ll save yourself a world of pain down the track. Let’s break down the main contenders so you can find the perfect match for your space and how you plan to use it.
Each style has its own pros and cons. The best choice really boils down to your garage’s layout, what you’re storing, and whether you want a permanent setup or something more flexible.
Freestanding Shelving: The Versatile Workhorse
For many Aussies, freestanding shelving is the go-to choice, and for good reason. It’s incredibly versatile and dead simple to set up. These units stand on their own, which means no drilling into walls and you can have them assembled in minutes.
This makes them a brilliant option for renters or anyone who likes to shuffle their workspace around every now and then. You can shift them as your needs change or pack them up and take them with you when you move.
For example, a weekend DIYer can use a freestanding unit for their power tools, paint tins, and car cleaning gear. If they decide to add a workbench later, they just slide the whole unit down the wall to make room. No fuss, no patching up holes. That adaptability is its greatest strength.
Wall-Mounted Shelving: The Ultimate Space Saver
If your floor space is precious, wall-mounted shelves are an absolute game-changer. By getting everything up off the ground, they free up the floor for your car, a new piece of equipment, or just more breathing room. This is a lifesaver in tight single-car garages where every square metre is prime real estate.
Wall-mounted units are perfect for stashing things you don’t need every day, like Christmas decorations or archive boxes. They keep everything out of the way but still within reach. A tradie might install heavy-duty wall shelving above their workbench to keep specialised tools organised and off the valuable work surface below.
The catch? Installation takes a bit more elbow grease. You’ll need to find the wall studs to make sure the shelves can safely hold the weight you plan to load them with. It’s a permanent solution, but one that offers incredible stability and space efficiency when done properly.
Modular Systems: The Customisable Solution
Modular systems are basically storage LEGO. They give you the flexibility to build a completely custom setup that fits your unique space and can grow right alongside you. You can start with a basic rack and add more bays, drawers, or cabinets as your tool collection expands or your business grows.
This approach has become seriously popular. In fact, more and more Aussie homeowners are realising the benefits of better safety and protection for their gear by investing in properly organised spaces.
For a business owner storing all sorts of inventory, a modular system is ideal. You could have deep shelves for bulky boxes, small bins for parts, and integrated cupboards for sensitive equipment, all in one seamless unit. This ability to mix and match is what makes modular shelving for a garage so powerful. To see how different components can work together, check out our storage shelving units.
Choosing the Right Material and Load Capacity
Once you’ve picked a style of shelving, the next big decision is what it’s made of and how much weight it can actually hold. The material you choose for your shelving for a garage is a big deal—it dictates strength, durability, and how long your setup will last. Get this right, and you’ve got a long-term storage solution. Get it wrong, and you’re looking at a wobbly, sagging mess.
Let’s be honest, a garage is a tough environment. You need materials that can handle the Aussie climate and the demands of a workshop. This isn’t the place for flimsy materials that will buckle under a bit of pressure.
Steel: The Unbeatable Choice for Strength
When it comes to pure muscle, nothing beats steel. It’s the go-to for a reason: it’s incredibly strong, durable, and built to handle the heavy stuff without breaking a sweat. We’re talking power tools, engine parts, full paint tins, and chunky toolboxes. Steel shelving just takes it all in its stride.
At Super Rack, our shelving units are made from high-grade steel, which is then powder-coated. This isn’t just for looks; that coating adds a tough, protective layer that resists scratches, chemicals, and most importantly, rust. That’s a must-have for any garage that gets a bit damp.
As you can see, steel’s structural integrity is in a different league compared to timber and plastic, making it the only practical choice for serious storage.
Comparing Other Materials
While steel is the clear winner for heavy-duty use, you’ll see other options out there. It pays to know their limits.
- Timber Shelving: Wood can look nice, but it’s a poor choice for a garage. It’s vulnerable to moisture and humidity, which can cause it to warp, swell, or even rot. On top of that, it’s a prime target for termites.
- Plastic Shelving: Plastic units are cheap and lightweight, and they won’t rust. That’s where the benefits end. They simply don’t have the strength for heavy items, often bowing under load or cracking in the cold. They’re only suitable for the lightest of duties.
For a reliable, long-term investment that keeps your gear safe and secure, steel is the undisputed champion.
Understanding Load Capacity
Just as crucial as the material is the load capacity—the maximum weight a shelf can safely hold. You’ll see this rating listed as ‘UDL’, which stands for Uniformly Distributed Load. A UDL rating assumes weight is spread evenly across the shelf, not piled in one spot. Concentrating all your weight in the centre is a recipe for disaster and can cause any shelf to fail, no matter its rating.
Getting your head around UDL is key to using your shelving safely. Don’t guess what your gear weighs; always pick a rating that gives you a comfortable safety margin.
A shelf rated for 200kg UDL is great for general storage—think archive boxes, camping gear, or car cleaning supplies. But if you’re a tradie storing heavy tool chests or a mechanic with spare parts, you’ll need something more serious. That’s where you need to look at heavy-duty garage shelving with ratings of 400kg UDL or even higher.
At Super Rack, we put clear, honest load ratings on all our products. We want you to know exactly what your shelving can handle so you can load it up with confidence, knowing it’s built to do the job safely for years to come.
How to Plan Your Garage Layout for Peak Efficiency
Excellent shelving is only half the battle won; a smart plan is the other. A well-designed layout can transform your garage from a chaotic dumping ground into a seriously high-functioning workspace. It all begins with a tape measure and a clear vision for how you’ll use the space.
Before you even think about buying a single shelf, take the time to measure your garage properly. Get the length, width, and height, but don’t stop there. You need to account for all those little obstacles that love to mess up a perfectly good plan.
Measure Twice, Organise Once
Getting your measurements right is the foundation of a great garage layout. It’s the single best way to avoid the headache of ordering shelving that doesn’t quite fit or ends up blocking something important.
Pay close attention to these elements:
- Doorways and Windows: Measure the clearance you need for doors to swing open fully, both for people and cars.
- Power Points and Switches: Make sure your new shelving won’t cover up access to outlets or light switches. No one wants to move a fully-loaded shelf just to plug in a drill.
- Fixed Obstacles: Note the location of things that can’t be moved, like the hot water system, fuse box, or structural support pillars.
Once you’ve got these numbers, sketch a rough floor plan. It doesn’t have to be a masterpiece. This simple drawing becomes your map, helping you visualise where everything can go without causing any dramas down the track.
Creating Your Garage Zones
The real secret to an efficient garage is zoning. Think of it like setting up different departments in a workshop. By creating dedicated areas for specific activities or types of gear, you build a logical flow where everything has its own home. This simple strategy makes finding—and putting away—your stuff an absolute breeze.
For example, a typical garage might be divided into three key zones:
- Vehicle Maintenance Zone: This is where you’d keep your car jacks, oil, coolant, and cleaning supplies. It makes sense to position this near where you park the car.
- Gardening and Outdoor Zone: Group your shovels, rakes, potting mix, and lawnmower together. Storing these near the garage door makes it easy to grab what you need without tracking dirt through the whole space.
- Workshop or DIY Zone: This area is for your power tools, workbench, and project materials. Keep your most-used hand tools on shelves right above your bench for quick access.
Planning your layout this way isn’t just about being tidy; it’s about making the space work for you. A zoned garage saves you time and frustration because you’re no longer hunting through random piles to find one specific tool.
Smart Shelving Placement Tips
With your zones mapped out, it’s time to decide where your shelving will live. The goal is to make your most-used items the easiest to reach. To really get this right, it helps to understand the core principles of space planning.
Here are a few practical tips that make a huge difference:
- Eyes on the Prize: Place your most frequently used tools and supplies on shelves between waist and shoulder height. This is your “prime real estate” zone, meaning you can grab what you need without bending, stretching, or rummaging.
- Heavy Items Go Low: For safety, always store your heaviest gear—like toolboxes or tubs of bolts—on the bottom shelves. This keeps the unit stable and reduces the risk of injury from lifting heavy objects over your head.
- Lighter Items Go High: Bulky but light items like empty eskies, camping chairs, or the kids’ old sporting gear are perfect for the top shelves. They’re out of the way but still easy to grab when you need them.
Planning a layout might feel like extra work upfront, but it’s the key to unlocking your garage’s true potential. At Super Rack, our team can offer expert advice on how our versatile garage storage systems can be configured to create the perfect zoned layout for your specific needs.
Installation and Safety Best Practices
Putting your new shelving for a garage together properly is about much more than convenience—it’s absolutely critical for safety. A wobbly or overloaded shelf isn’t just an annoyance; it’s a serious hazard waiting to happen. Let’s walk through the right way to get your shelving built and secured so it’s rock-solid from day one.
This focus on doing things the right way is more important than ever. More Aussies are looking for durable, reliable solutions for their own gear, mirroring the trends in the bigger storage market. You can find out more about the trends shaping Australia’s storage market and see why quality matters.
Assembling Your Shelving Like a Pro
Most quality freestanding shelving, like the units from Super Rack, is designed for a pretty straightforward build. Still, taking a few extra minutes to get it right will pay off for years to come. Before you even open the box, grab a few basic tools to make the job a whole lot easier.
You’ll probably need:
- A rubber mallet to tap beams into place without chipping the powder coat.
- A spirit level to make sure everything is perfectly straight.
- A pair of gloves for a better grip and to keep your hands clean.
Start by laying out all the parts and giving them a quick check against the instruction manual. Build the frame first, making sure every connection is snug and secure. Once the frame is standing, use your spirit level on the beams. Check that they’re perfectly horizontal before you even think about putting the shelf panels on.
The Non-Negotiables of Garage Shelving Safety
With your unit assembled, the next steps are all about making it safe. These aren’t just helpful tips; they’re essential practices to prevent accidents, especially in a busy garage or a home with kids around.
1. Level It Out on Uneven Floors
Nearly all garage floors in Australia have a slight slope built in for drainage, which means your floor isn’t perfectly flat. Putting a shelving unit straight onto an uneven surface is asking for trouble—it will be unstable and put stress on the frame. A wobbly shelf is an unsafe shelf. Taking the time to properly level your unit is the single most important step for ensuring stability.
If your shelving has adjustable feet, use them. Tweak each one until your spirit level shows it’s perfectly plumb and doesn’t rock. If your unit doesn’t have them, sturdy plastic shims placed under the uprights will do the same job.
2. Always Anchor to the Wall
This is the golden rule for any freestanding shelving for a garage. Even the heaviest, most solid-looking unit can become a tipping hazard if it gets knocked or climbed on by a curious child. Securing it to a wall is simply non-negotiable for safety.
Use the brackets that came with your unit to fix the top of the frame to a wall stud—not just the plasterboard. A cheap stud finder is the best tool for locating these solid anchor points behind the wall. This simple step gives you massive peace of mind and turns a stable shelf into an immovable one.
3. Distribute Weight Correctly
Remember that UDL (Uniformly Distributed Load) we talked about? Now’s the time to put that knowledge into action. Spreading the weight out evenly is what stops shelves from bowing or failing.
- Heaviest items always go on the bottom shelves. This simple step lowers the unit’s centre of gravity, making it far more stable.
- Avoid piling all the weight in one spot. Spread heavy toolboxes or containers across the full width of the shelf.
- Don’t exceed the rated capacity. Know your shelf’s limit and make sure you stay well under it for a good safety margin.
At Super Rack, we’re serious about safety. Our products are engineered for durability, but proper installation is what unlocks their true performance. By following these steps, you can load up your shelves with confidence, knowing they are secure, stable, and ready for years of hard work.
Common Questions About Garage Shelving
To wrap things up, here are answers to some of the most common questions we get about shelving for a garage. These quick, clear answers should help you lock in your decision and get your organisation project started with confidence.
Getting the right info upfront saves a lot of headaches later. Whether you’re wondering about materials, weight limits, or installation quirks, we’ve got you covered with practical advice from years of helping Aussies get their garages sorted.
What Is the Best Material for Garage Shelving in Australia?
For most Aussie garages, high-quality steel is the best choice, hands down. It has the raw strength and durability to handle our tough conditions, from coastal humidity to the dry inland heat. A garage is a demanding environment, and your shelving needs to be up for the job.
Powder-coated steel, like the shelving from Super Rack, is specifically engineered to fight off rust, corrosion, and pests. This makes it the perfect material for holding heavy gear like toolboxes, car parts, and tubs of bolts without breaking a sweat.
While you might see other options out there, they come with big trade-offs:
- Timber: Looks good at first, but it’s a magnet for moisture. That can lead to warping, sagging, or rotting over time, not to mention it’s a prime target for termites.
- Plastic: It’s rust-proof and lightweight, but plastic shelving just doesn’t have the structural integrity for serious loads. It can turn brittle in the cold or start to bow under even moderate weight.
For a safe, long-lasting investment that gives you the best bang for your buck, steel is the clear winner for any serious shelving for a garage.
How Much Weight Can Garage Shelving Actually Hold?
The weight capacity—or load rating—of garage shelving varies massively, so you have to check the manufacturer’s specs before you buy. This isn’t something you want to guess. At Super Rack, our load ratings are crystal clear so you know exactly what you’re getting.
Our standard-duty units are typically rated for around 200kg UDL (Uniformly Distributed Load) per shelf. This is more than enough for general storage like archive boxes, camping gear, and most household tools. It’s a brilliant all-rounder for getting your home decluttered.
But for tradies with hefty tool chests or small businesses storing stock, our heavy-duty options are the only way to go. These are rated for 400kg UDL per shelf or even more, giving you the muscle you need for serious applications.
Remember, ‘UDL’ is the key here. It means the weight must be spread evenly across the shelf. Piling all your heavy items right in the centre puts massive stress on one point and can cause the shelf to fail, no matter what its rating is. Always choose shelving with a load capacity well above what you plan to store to give yourself a safe margin.
Do I Really Need to Fix Freestanding Shelves to the Wall?
Yes, we always recommend it. Even though quality freestanding units are designed to be stable, anchoring them to a wall stud is a critical safety step. This is especially true in a busy workshop or any home with kids running around.
Fixing your unit to the wall completely eliminates the risk of it tipping over if it gets bumped by a car, accidentally knocked, or loaded unevenly. It’s a small bit of effort that provides huge peace of mind and makes your entire setup far safer.
Good quality shelving kits, including ours from Super Rack, come with the right brackets or have pre-drilled holes in the uprights to make this easy. Just make sure you’re fixing into a solid wall stud—not just the plasterboard—for a secure hold. A cheap stud finder from the local hardware store is a great investment for this job.
How Can I Install Shelving on an Uneven Garage Floor?
Uneven concrete floors are incredibly common in garages all over Australia, often because they’re sloped slightly for water drainage. Trying to install a tall shelving unit on a slope without levelling it is just asking for trouble.
The best fix is to use shelving for a garage with adjustable feet. Many quality systems, including those from Super Rack, have levelling feet that you can screw in or out. This lets you adjust each corner until the whole unit is perfectly straight and stable, with zero wobble.
If your unit doesn’t have adjustable feet, you can use shims—small, tough wedges of plastic or hardboard that you slide under the legs to level out the frame. A level and stable unit is absolutely essential for safety, as it ensures weight is distributed correctly through the frame just as it was designed to be.
Ready to transform your garage with a storage solution that’s built to last? The team at Super Rack is here to help you find the perfect shelving for your needs. We offer expert advice, competitive pricing, and fast, nationwide delivery on our huge range of high-quality steel shelving.
Explore our full range and reclaim your space today by visiting https://www.superrack.com.au.